VirtualBox Snapshot management lets you capture a safe restore point for your VM. When you take a snapshot, VirtualBox records configuration, disk state, and (if running) memory so you can roll back cleanly. This guide covers how to take, restore, merge, and delete VirtualBox snapshots, plus light automation with VBoxManage on VirtualBox 7.2. For deeper reference, see Oracle’s User Guide.
Understanding the VirtualBox Snapshot
A VirtualBox Snapshot is a point-in-time checkpoint. It saves the machine’s settings, redirects changes to a differencing disk, and, if the VM is running, also captures its RAM. Snapshots grow as the guest changes. Keep only a few well-named restore points, as very long chains add overhead.
Snapshot vs. Backup
Important: Snapshots aren’t backups. They depend on the base disk. For disaster recovery, export to OVF/OVA or use clones. Pairing backups with a periodic VirtualBox Snapshot gives both safety and speed.
Key Benefits
Isolated Testing
Test updates, kernels, or drivers and roll back to a known-good state with a single restore.
Rapid Recovery
Recover from config mistakes without reinstalling or reimaging the VM.
Efficient Storage
Differencing images start small and grow only with changes you make.
Branching
Restore an older point and branch to explore alternate paths in parallel.
How to Take, Restore & Delete a VirtualBox Snapshot (7.2)
Note: In VirtualBox 7.2, the Snapshots tab is located at the top pane next to Details after selecting a VM, whereas in earlier versions (such as 7.1.x), the Snapshots tool is accessible through the Machine Tools dropdown menu beside the VM list.
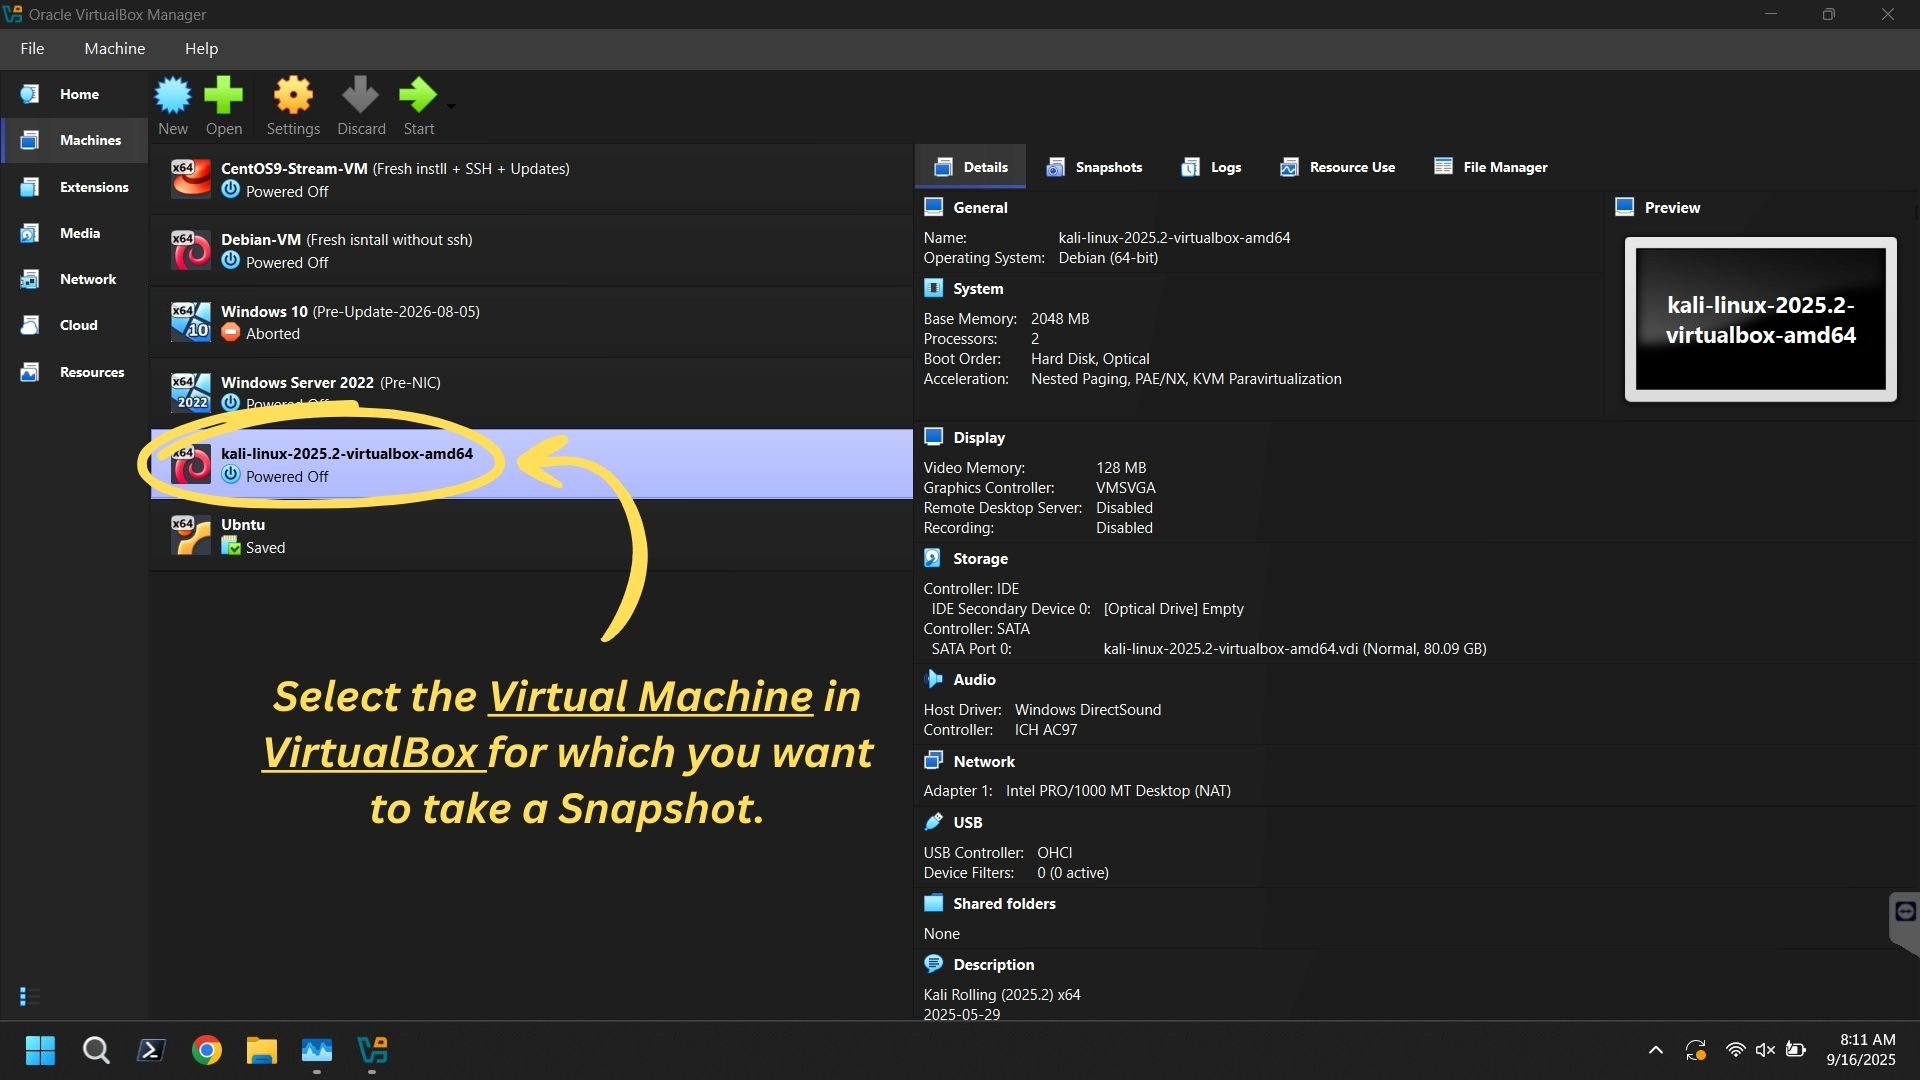
Select Your VM
Launch VirtualBox Manager and select the virtual machine (VM) you want to take a snapshot of. Ensure the VM is in the exact state you want to capture.
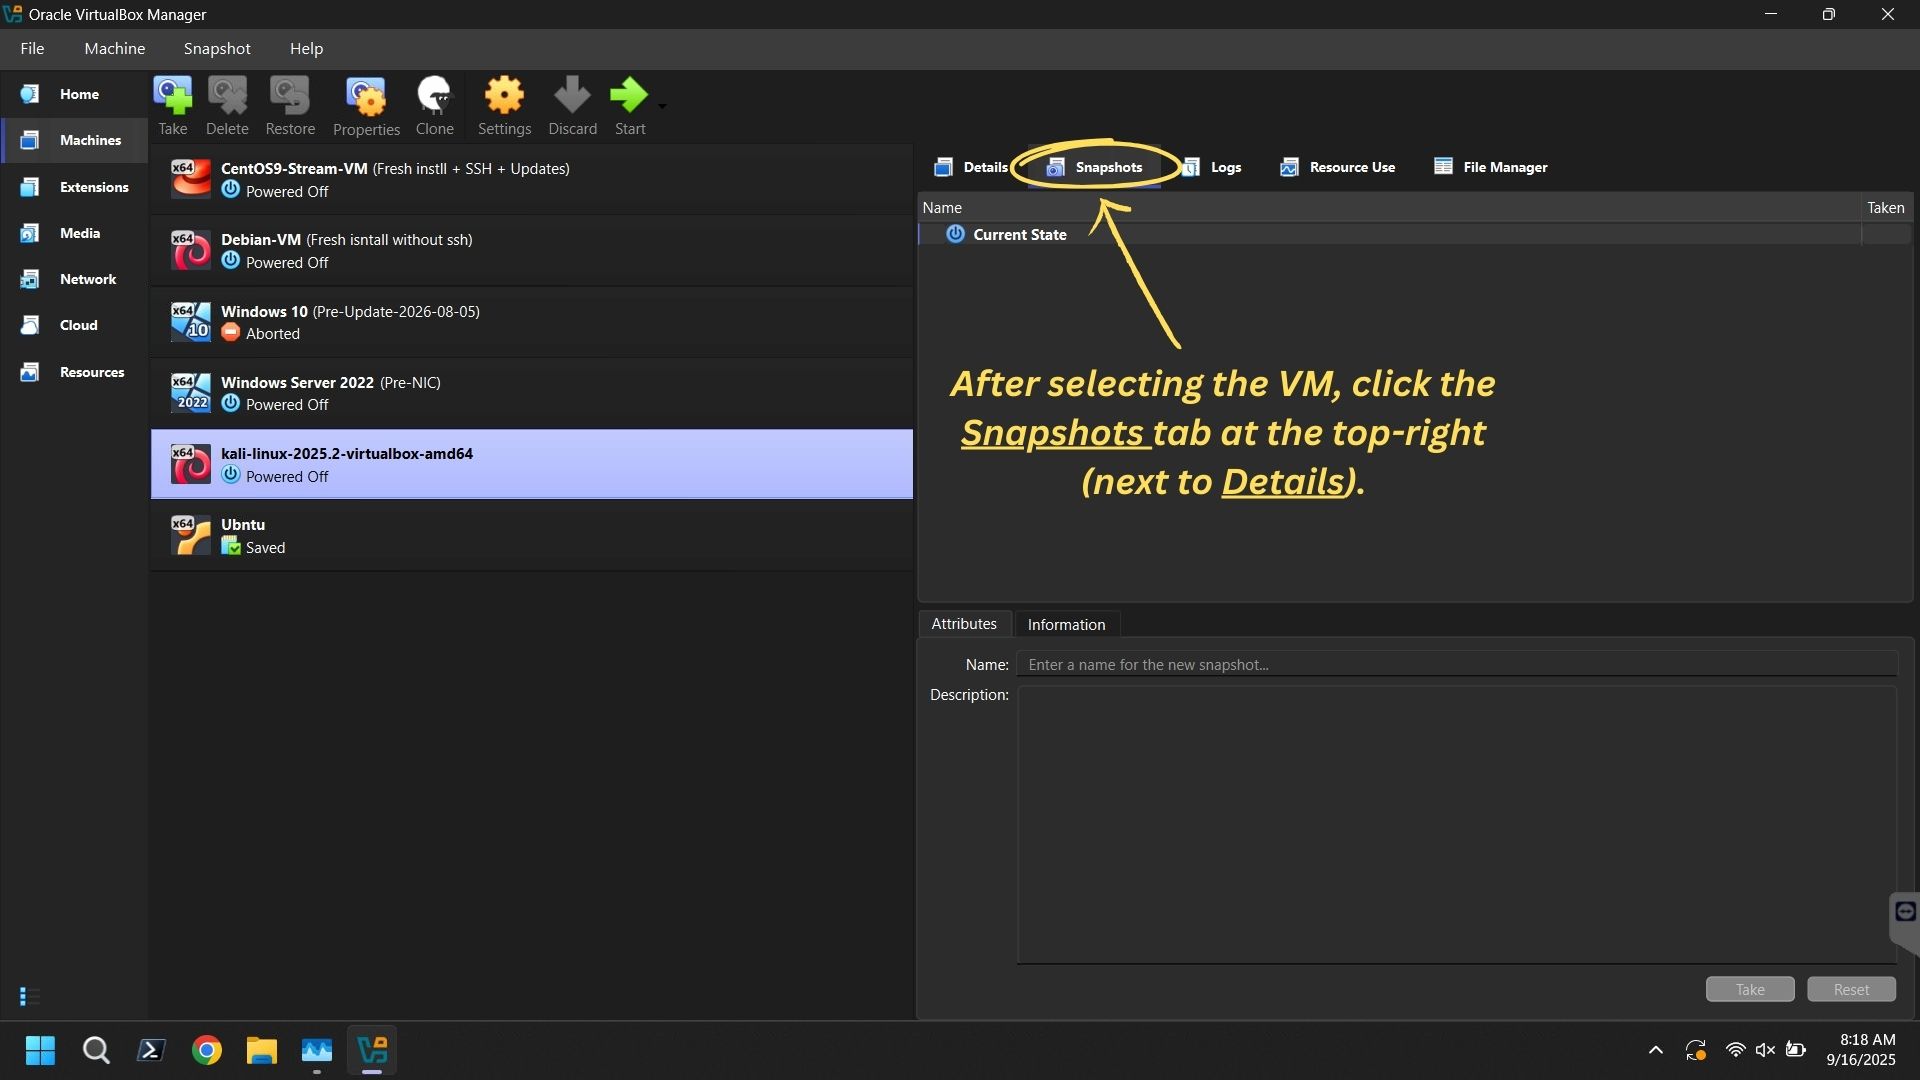
Open the Snapshots Panel
After selecting the VM, look at the right-side pane at the top and click the Snapshots tab (next to the Details tab).
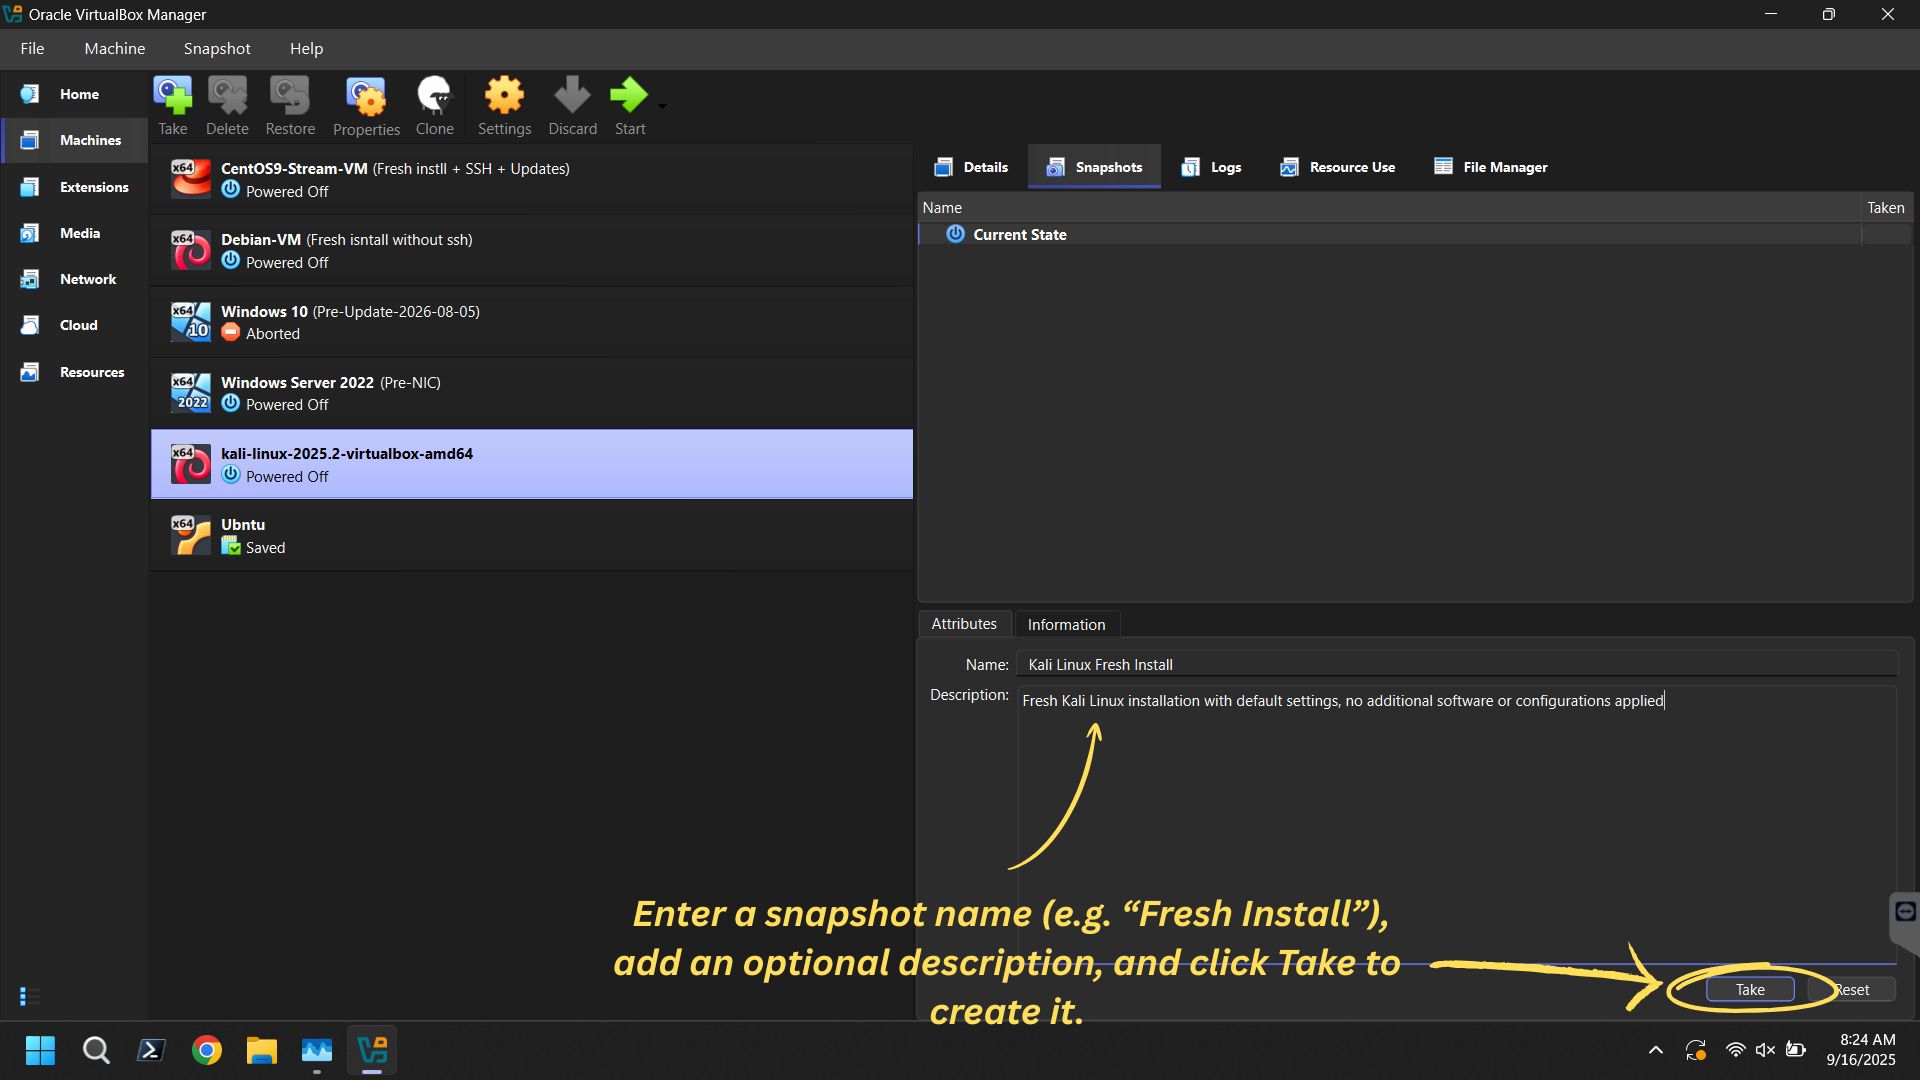
Take a Snapshot
After opening the Snapshots tab, enter a name for the snapshot in the Name field (for example, “Fresh Install” or “Pre-Update”), optionally add a description in the Description field, and click the Take button at the bottom-right corner to create the snapshot.
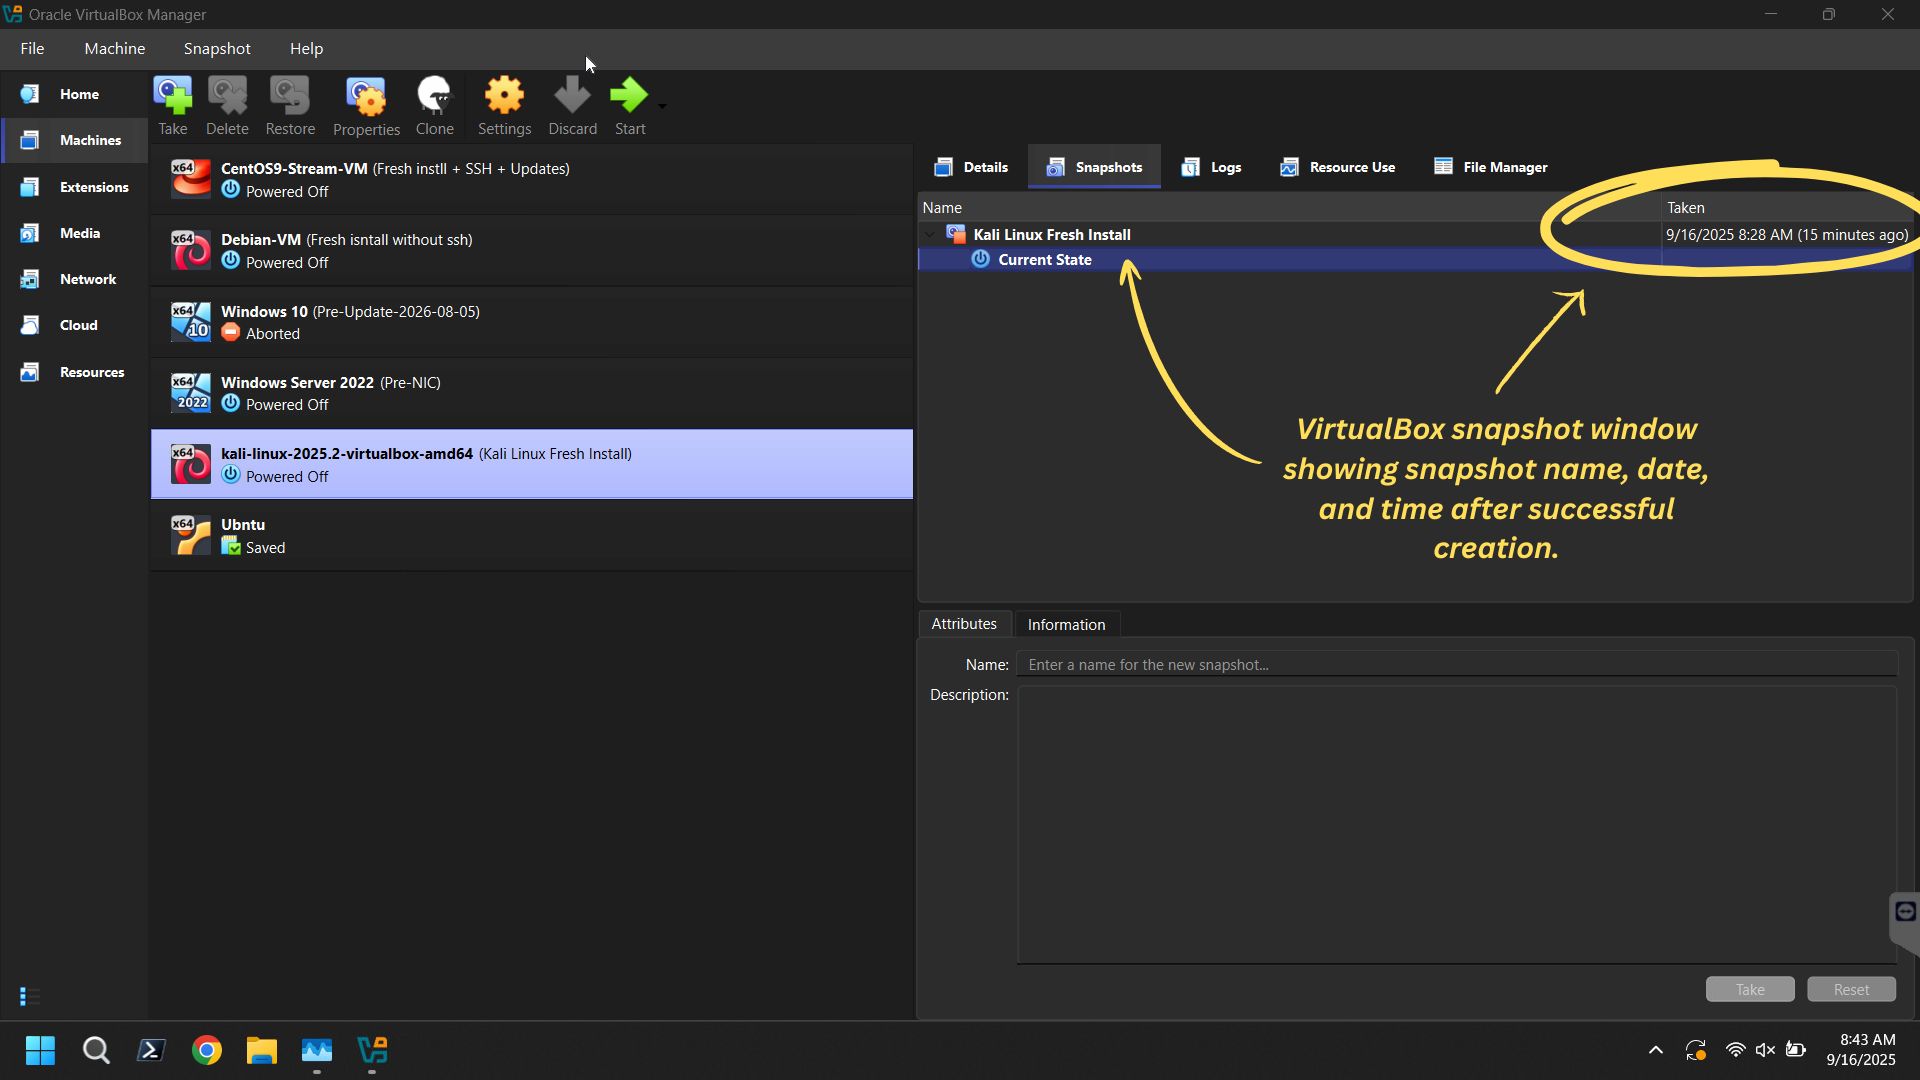
Confirm & Wait
VirtualBox briefly pauses the VM to create a differencing disk and save memory if running. For large VMs, this may take longer, but the snapshot is then immediately available
Command Line (VBoxManage)
# Linux/macOS
VBoxManage snapshot "VM Name" take "Win11-PreUpdate-2025-08-30" --description "Before August updates"
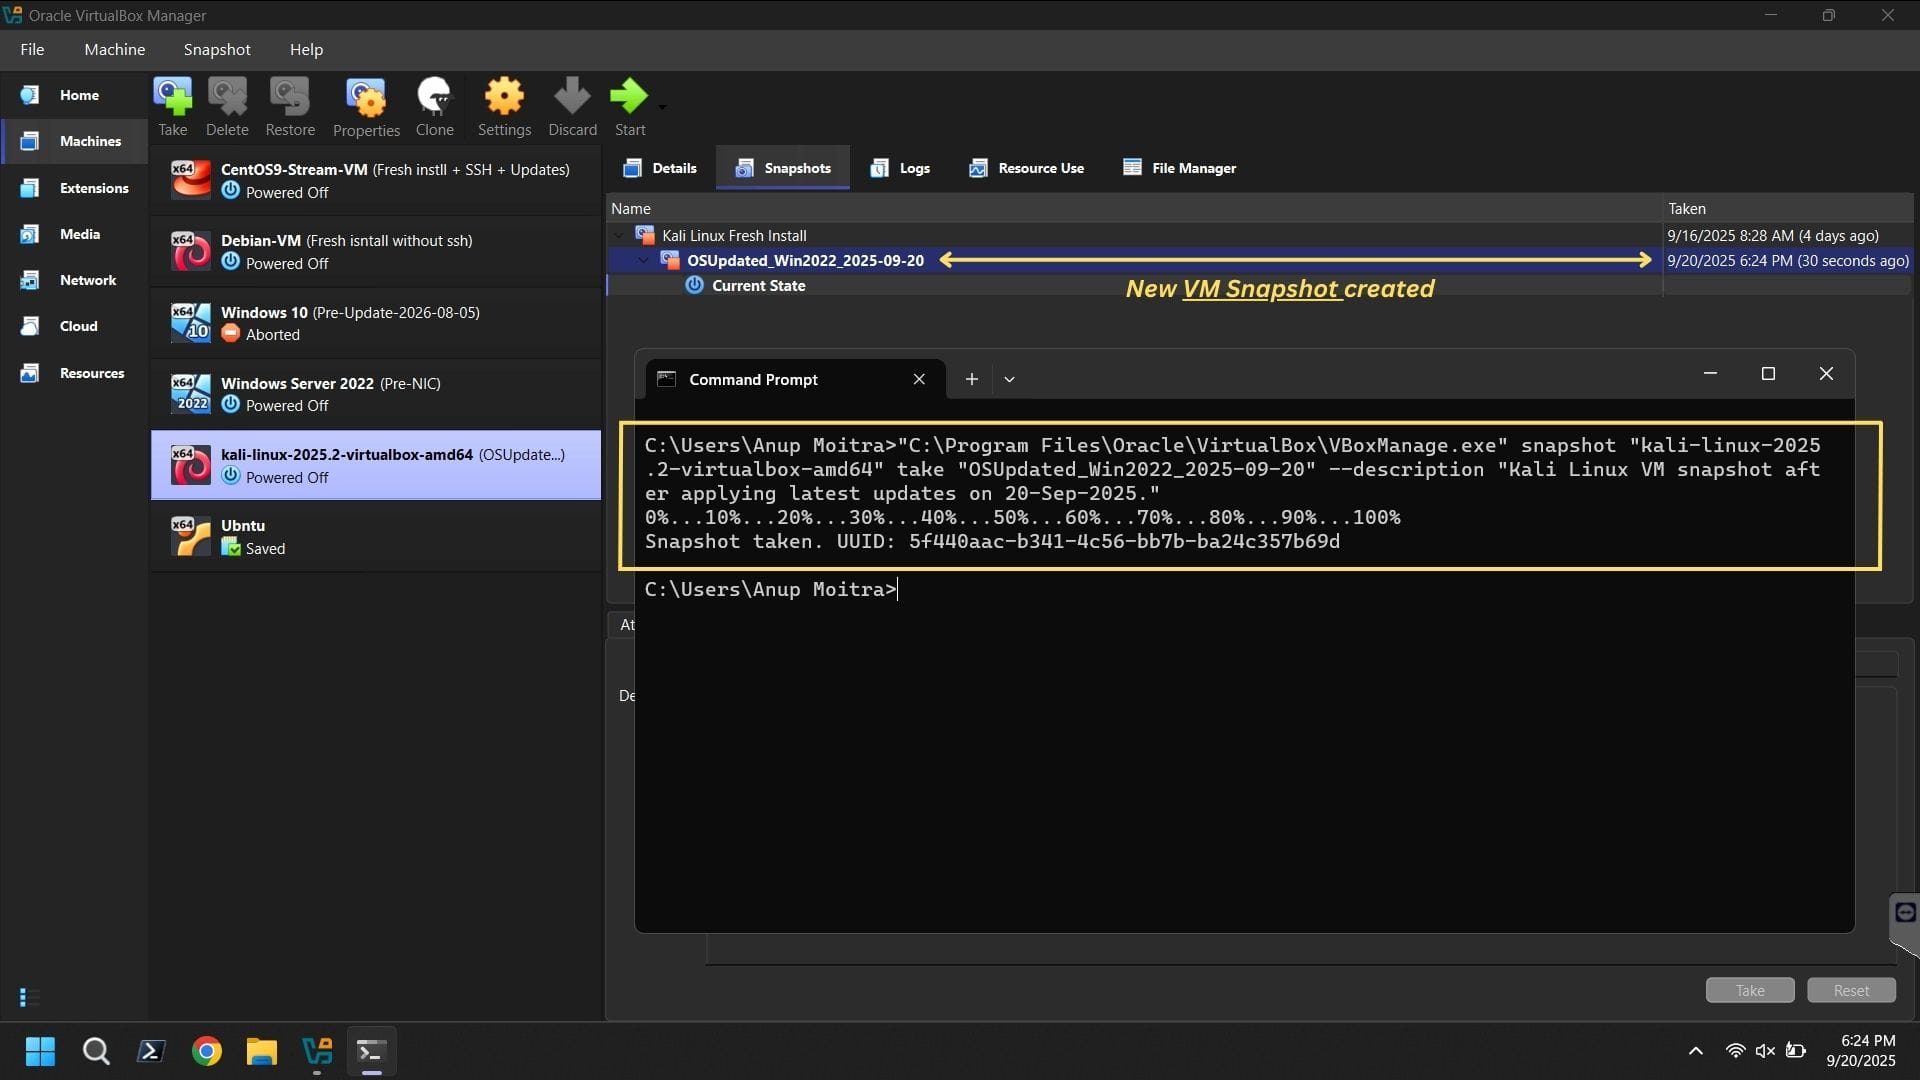
# Windows
"C:\Program Files\Oracle\VirtualBox\VBoxManage.exe" snapshot "VM Name" take "Win11-PreUpdate-2025-08-30" --description "Before August updates"CLI reference: snapshot commands (see VirtualBox 7.2 VBoxManage (snapshot)).
Pro Tip: “Save the machine state” is separate from snapshots. Saved state pauses RAM/CPU so you can resume; a snapshot is a durable restore point.
Manage, Restore & Delete Snapshots
Restore
Right-click a snapshot and choose Restore. VirtualBox reverts the VM’s disks, settings, and (if captured) memory to that saved state.
Tip: Take a fresh snapshot first to preserve your current work.
Delete / Merge
Deleting a snapshot merges its changes into the parent image and can free disk space. This may temporarily require additional space during consolidation.
Tip: Reclaim space afterward using Virtual Media Manager or VBoxManage modifymedium --compact.
Branching
Restoring an older snapshot and then creating a new one generates a branch in the snapshot tree. This allows parallel testing and experimentation without affecting the main line.
Backups
Snapshots are not true backups. For reliable recovery, copy the complete VM folder or export the VM to OVF/OVA. Use snapshots as a complement to, not a replacement for, backups.
Merge VirtualBox Snapshots (Delete to Consolidate)
To merge VirtualBox snapshots, delete the target checkpoint. VirtualBox writes its differences back into the parent, shortening the chain and simplifying storage.
Heads-up: Consolidation can take time and needs free disk space. Avoid heavy I/O and keep backups for critical machines.
Open the Tree
Select the VM → Snapshots panel to view the chain that includes your VirtualBox Snapshot entries. Current state and prior checkpoints are listed in order.
Pick a Target
Right-click the entry you no longer need, usually an older pre-upgrade point.
Delete to Merge
Click Delete. This action will merge snapshot data into the parent image. After confirmation, consolidation begins.
Wait
Larger chains and busy disks take longer. Do not power off the host while consolidation runs.
(Optional) Compact
Reclaim space via Virtual Media Manager → select VDI → Compact, or:
VBoxManage modifymedium disk "/path/to/disk.vdi" --compactVerify
Confirm the entry is gone and the VM boots normally.
VBoxManage snapshot "VM Name" list --machinereadableSnapshot vs Clone: Which Strategy Fits?
VirtualBox snapshots are quick restore points tied to the base disk. Clones create new, independent (full) or space-saving (linked) VMs. Use snapshots for short-term testing; use clones for portability and long-term copies.
Comparison Table
| Feature | Snapshot | Full Clone | Linked Clone |
|---|---|---|---|
| Independence | Depends on base + diffs | Independent copy | Depends on source snapshot |
| Disk Usage | Small initially; grows with changes | Largest (full copy) | Smallest (differencing) |
| Use Case | Short-term rollback/testing | Backups/portability | Quick lab fleets |
| Risk | Long chains slow I/O | More storage | Breaks if source removed |
Best Practices for VirtualBox Snapshots
Capture Milestones
Take a snapshot before major updates or configuration changes, not after every tiny tweak.
Keep It Short
Maintain two or three recent points; long chains slow I/O and complicate merges.
Name Clearly
Include date + purpose (for example, Ubuntu-Upgrade-2025-08-30) and note what changed.
Not a Backup
Pair snapshots with exports or full clones for off-machine recovery.
Separate Data
Use a second write-through disk for important files so restores don’t roll back your data.
Automate: Cycle, Clean & Monitor
Rotate checkpoints using scripts. Example Bash (keep last three):
#!/bin/bash
VM_NAME="UbuntuTest"
DATE=$(date +%F)
# Take a new snapshot with date
VBoxManage snapshot "$VM_NAME" take "auto-$DATE" --description "Nightly auto snapshot"
# List snapshots and delete older ones, keeping the newest 3
SNAPSHOTS=$(VBoxManage snapshot "$VM_NAME" list --machinereadable | grep '^SnapshotName' | cut -d'=' -f2 | tr -d '"')
COUNT=0
for SNAP in $SNAPSHOTS; do
  COUNT=$((COUNT+1))
  if ( $COUNT -gt 3 ); then
    VBoxManage snapshot "$VM_NAME" delete "$SNAP"
  fi
done
Schedule with cron (Linux/macOS) or Task Scheduler (Windows). Monitor sizes & host storage with VBoxManage showvminfo --machinereadable. Integrate creation/cleanup into CI pipelines for fast rollback during tests.
Troubleshooting Common Issues
Missing or Corrupted Entries
Shut down cleanly before taking a snapshot. Inspect VBox.log (see “Where VirtualBox stores its files” in the manual). Keep VirtualBox updated, as many fixes land in point releases. Back up the entire VM folder (including snapshot files) before any repairs.
Disk Bloat & Slow I/O
Delete/merge old checkpoints to collapse long chains. Ensure free space before consolidation; it needs headroom. Compact with Virtual Media Manager or VBoxManage modifymedium --compact.
Restore Fails or Boot Errors
Restoring resets settings, so verify controllers and storage mapping. Store critical data on write-through disks to avoid rolling back files. After major upgrades, power off VMs before updating VirtualBox, then capture a fresh point. If nothing else works, recover from an export or a clone.
Frequently Asked Questions
What exactly does a VirtualBox Snapshot capture?
Is a snapshot the same as a backup?
Can I take one while the VM is running?
Where are snapshots stored?
How much space do they use?
Conclusion: Master the VirtualBox Snapshot
A VirtualBox Snapshot is a fast, reliable restore point for testing and recovery. Use best practices to avoid disk bloat and pair snapshots with proper backups for full resilience.
Quick Reference
- Instant rollback to known-good states.
- Safe sandboxing for upgrades.
- Efficient change tracking via differencing disks.
- Parallel experimentation with branches.

Great guide! The snapshot vs. backup explanation was really helpful. I’ll definitely start using both together. Thanks for the tips on automation too!
Thanks! Glad it helped. Let me know how the automation works out for you!