Install VirtualBox and CentOS Stream 10 to build a safe, professional-grade Linux lab on your Windows, macOS, or Linux host. This guide walks you through installing Oracle VM VirtualBox, downloading the correct CentOS Stream 10 ISO, creating a tuned virtual machine (including UEFI, networking, and storage configuration), and finishing with system updates, EPEL repository setup, and Guest Additions installation. For deeper reference, see Oracle’s VirtualBox 7.2 User Guide and the CentOS Stream downloads page.
Why VirtualBox and CentOS Stream 10?
Safe and Isolated Environment
Experiment freely without affecting your host operating system. Test configurations, break things, and use snapshots to roll back changes easily.
Enterprise-like Foundation
CentOS Stream 10 tracks the ongoing development of Red Hat Enterprise Linux (RHEL) 10, providing a current and relevant environment for lab work and pre-production testing :cite[1]:cite[4].
Snapshots and Cloning
Take system snapshots before making risky changes and clone virtual machines for parallel testing scenarios.
Important Note: CentOS Stream is a rolling-release distribution that serves as the upstream development branch for RHEL. While excellent for labs and testing, it may introduce changes more frequently than traditional stable releases. For production environments requiring maximum stability, consider RHEL itself or downstream alternatives like Rocky Linux or AlmaLinux :cite[2]:cite[8]:cite[10].
System Requirements
CPU and Virtualization
64-bit CPU with Intel VT-x or AMD-V enabled in BIOS or UEFI. Do not run other hypervisors simultaneously, such as Hyper-V.
RAM and Storage
Minimum 4 GB RAM and 20 GB free disk space. Recommended 8 GB RAM and 30 GB or more storage for a GUI installation.
Internet Connection
Required for downloading installation files and system updates. The DVD ISO is several gigabytes, while the Boot ISO is smaller and downloads packages during installation.
Apple Silicon (M-series Macs): Use the aarch64 ARM64 CentOS Stream 10 ISO. VirtualBox on Apple Silicon runs ARM guests natively.
Step 1: Install VirtualBox and the Extension Pack
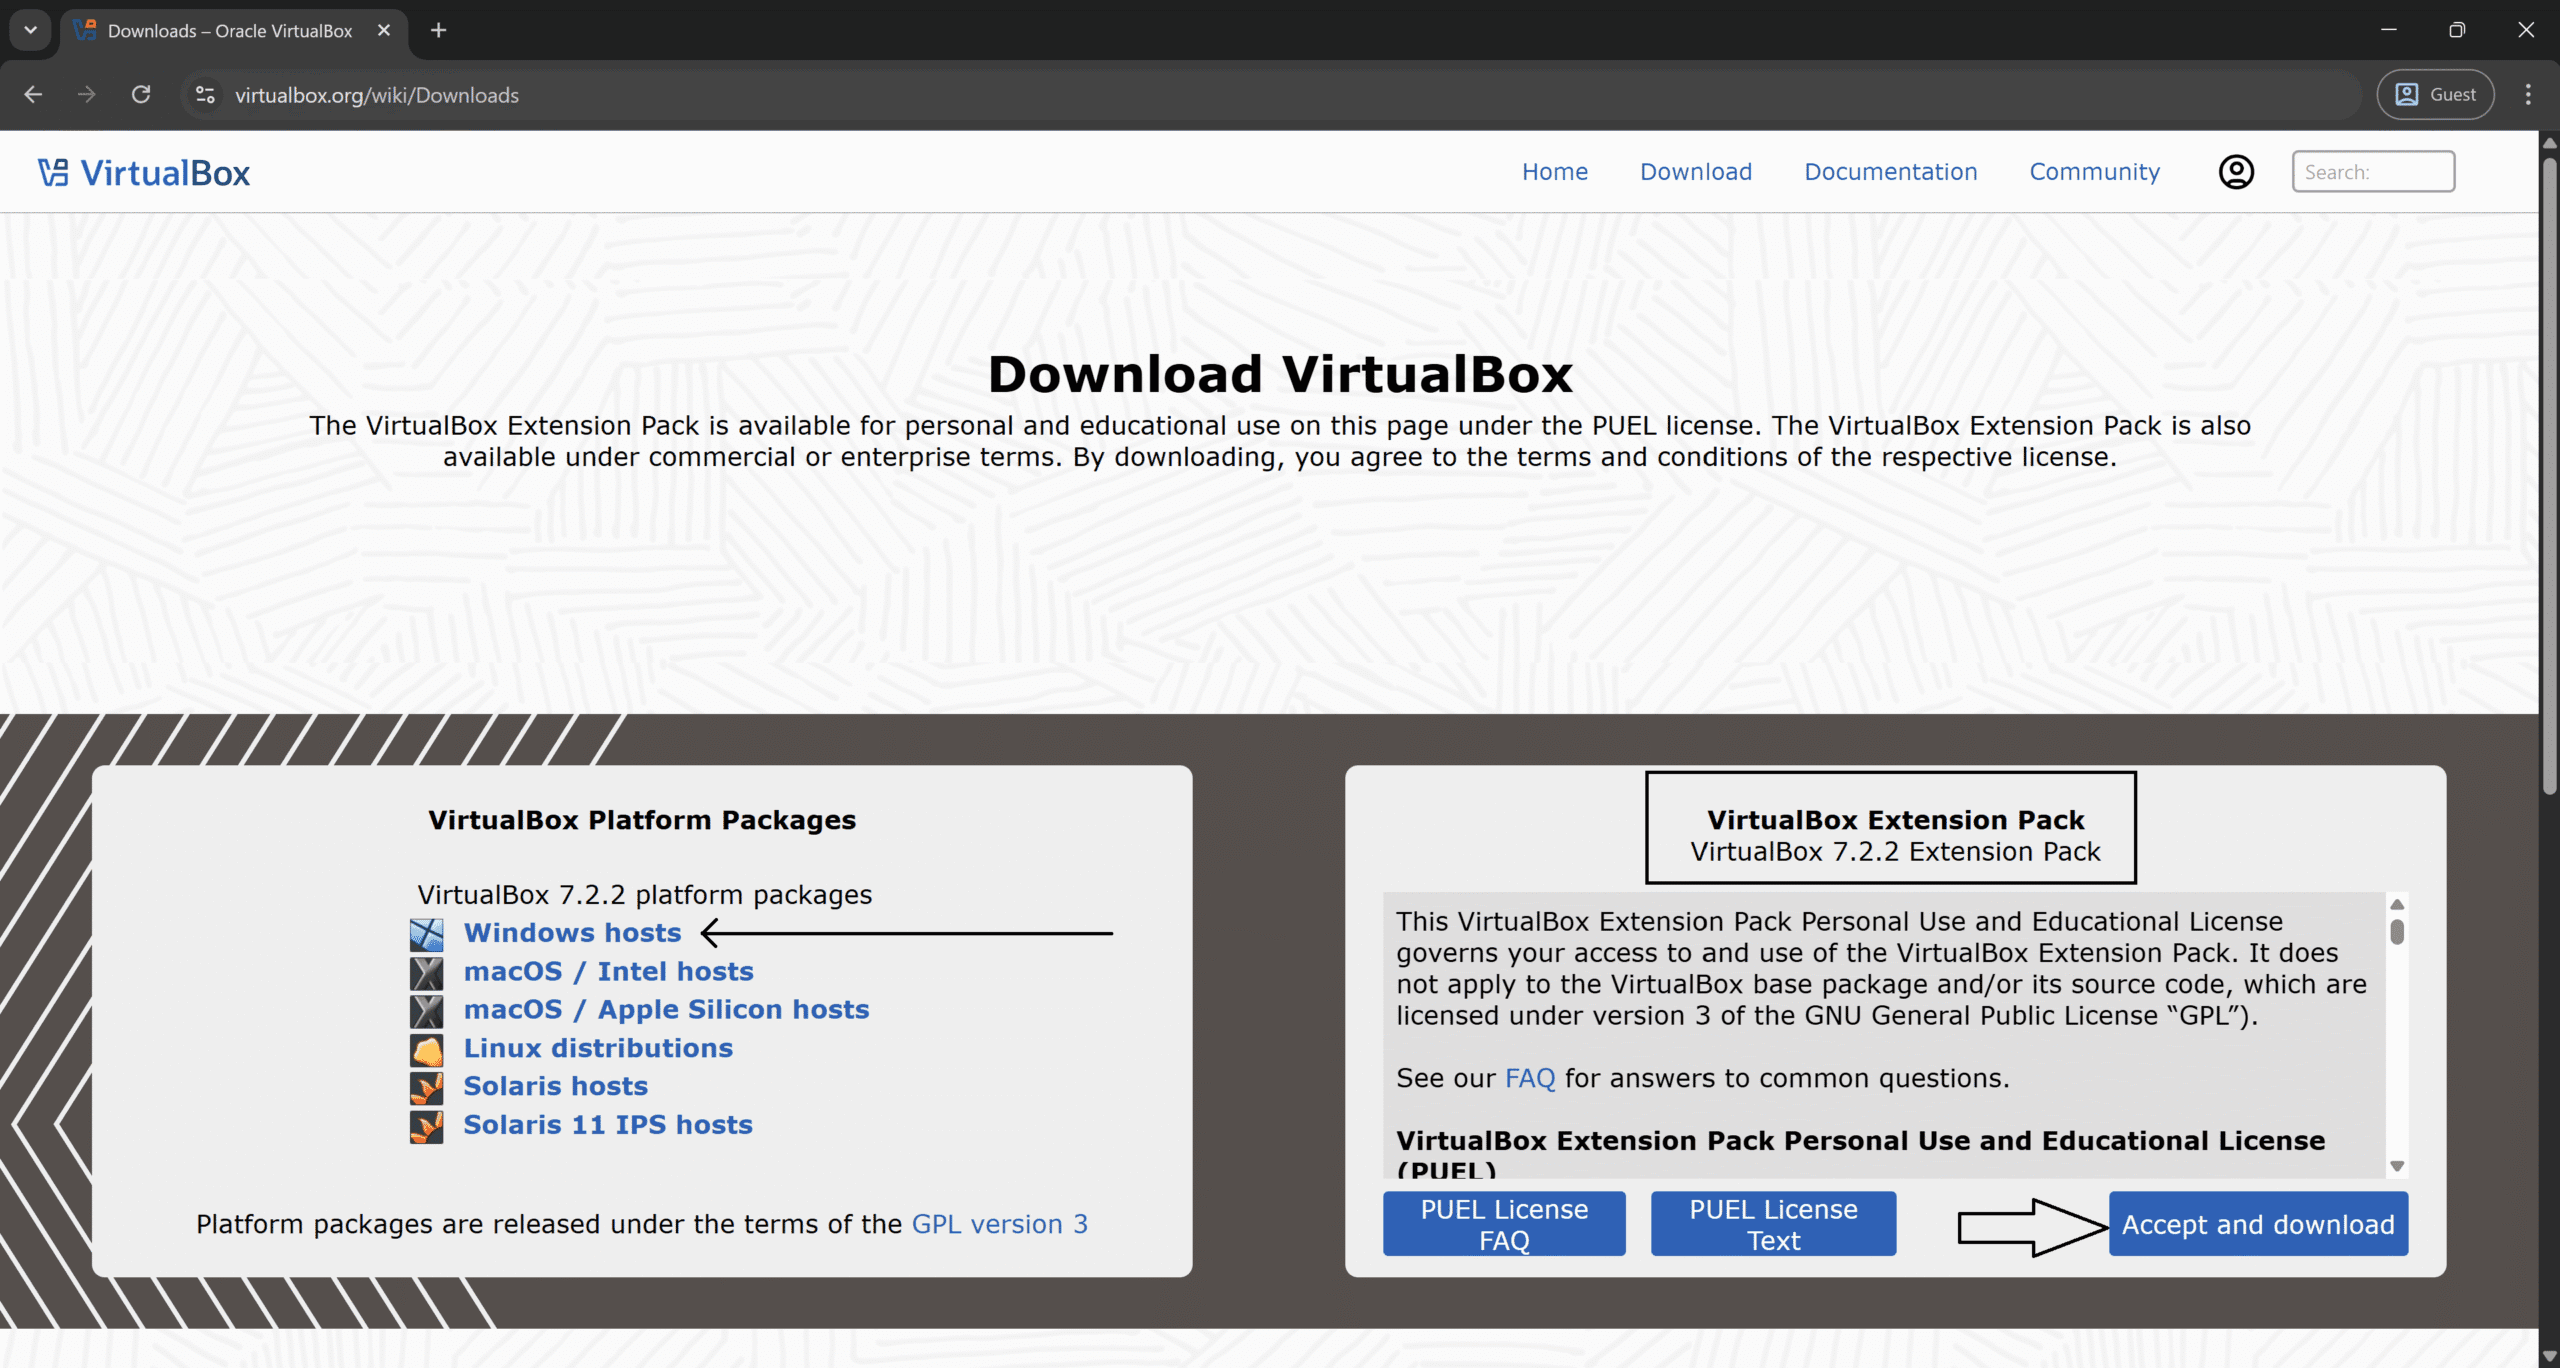
Download VirtualBox
Download the latest installer for your host platform from the official VirtualBox website. Optionally download the matching Extension Pack for additional features like USB 2.0/3.0 support, VirtualBox Remote Desktop Protocol (VRDP), NVMe storage, and disk encryption.
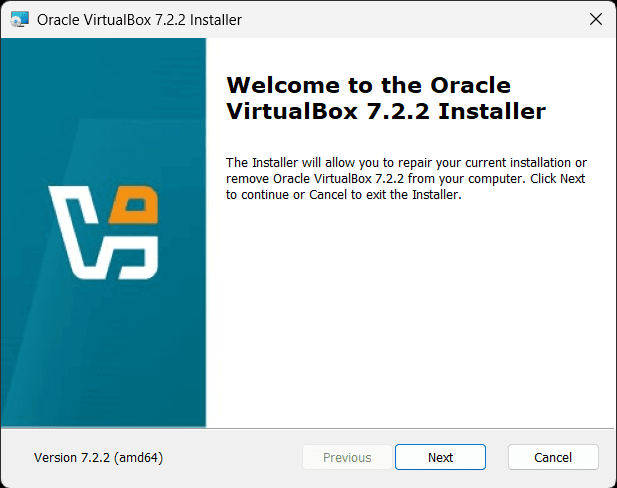
Run the Installer
Run the installer with administrator privileges and accept the default configuration options. On Linux hosts, ensure the kernel modules build successfully, and reboot if the installer requests it.
Windows hosts troubleshooting: If you only see 32-bit guest options or encounter an error mentioning VT-x or AMD-V, enable virtualization in your BIOS/UEFI firmware and disable conflicting hypervisors such as Hyper-V, Windows Hypervisor Platform, and the WSL2 Hyper-V backend.
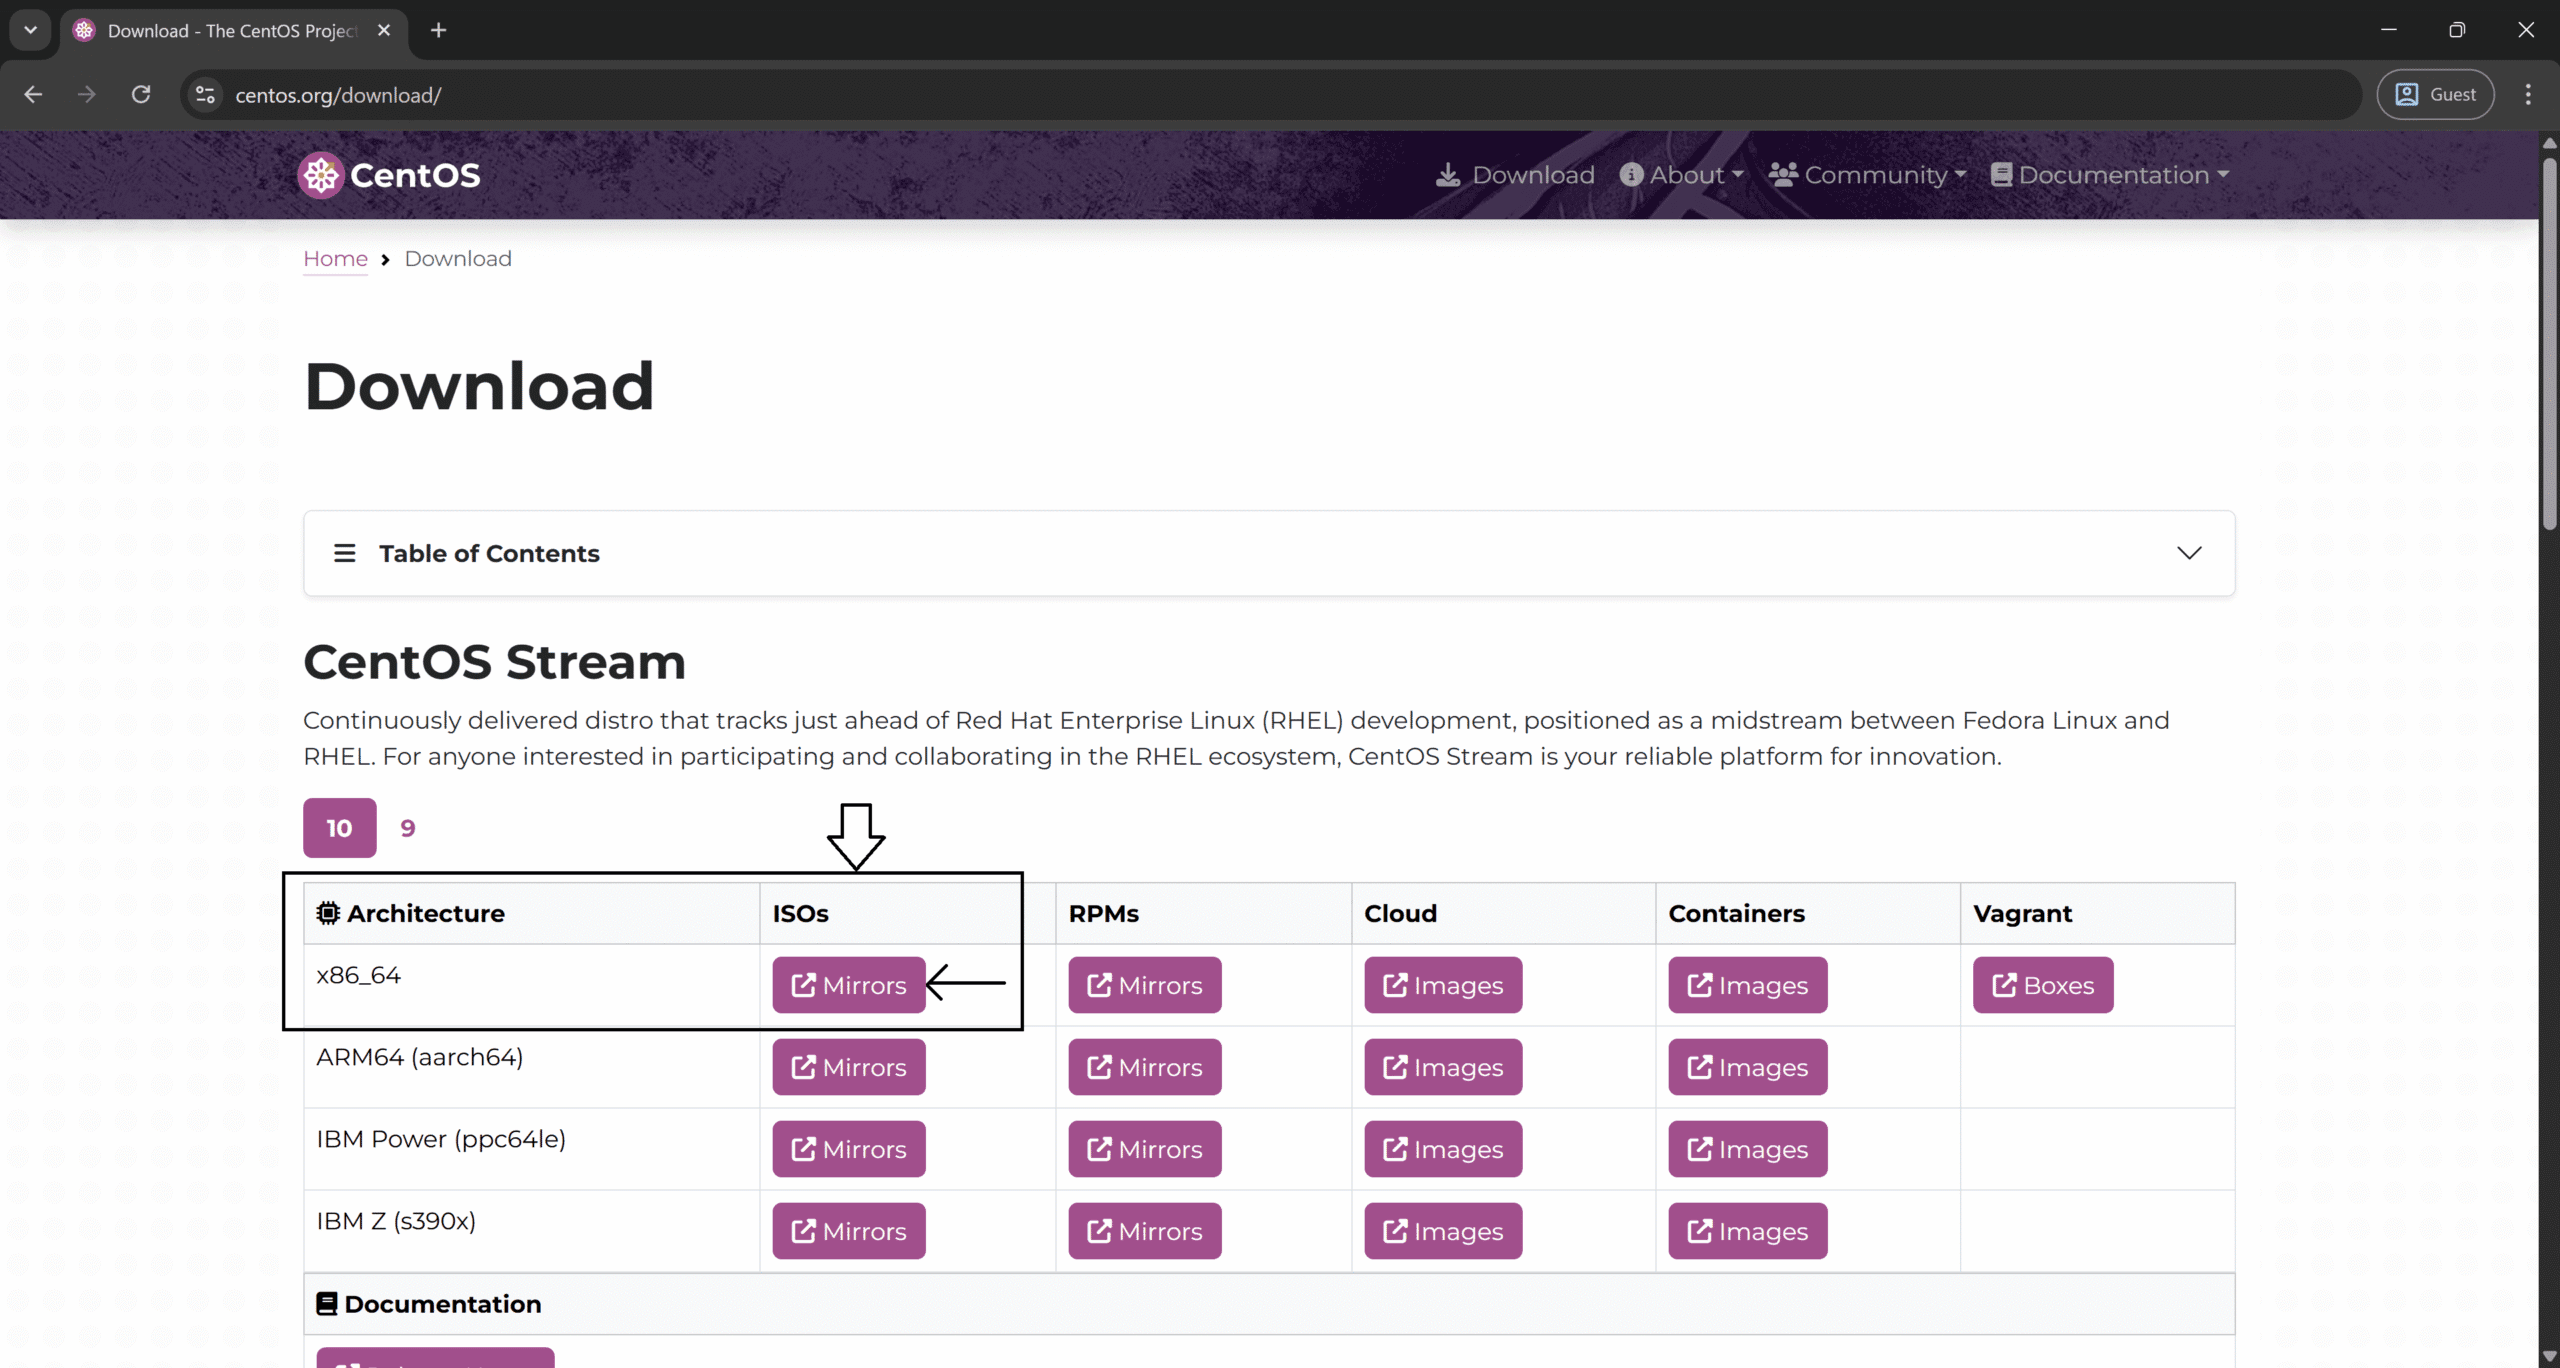
Step 2: Download the CentOS Stream 10 ISO
Choose the ISO type that best fits your workflow. The DVD image supports mostly offline installation, while the Boot image is smaller and fetches packages from online repositories during installation.
| Image Type | Architectures | Size (Approximate) | When to Use |
|---|---|---|---|
| DVD | x86_64, aarch64 | 7 to 8 GB | Offline installations or limited internet connectivity; provides consistent installation media |
| Boot | x86_64, aarch64 | 0.8 to 1.2 GB | Fast download; installs latest packages directly from online repositories during setup |
Verify the Download with Checksums
Always verify your ISO download integrity using SHA256 checksums:
# Linux
sha256sum CentOS-Stream-10-latest-*-dvd1.iso

# macOS
shasum -a 256 CentOS-Stream-10-latest-*-dvd1.iso

# PowerShell on Windows
Get-FileHash .\CentOS-Stream-10-latest-*-dvd1.iso -Algorithm SHA256
Compare the generated result with the SHA256SUM file provided alongside the ISO on the download mirror. For maximum security assurance, verify the signed checksum file with the CentOS GPG key.
Step 3: Create the Virtual Machine
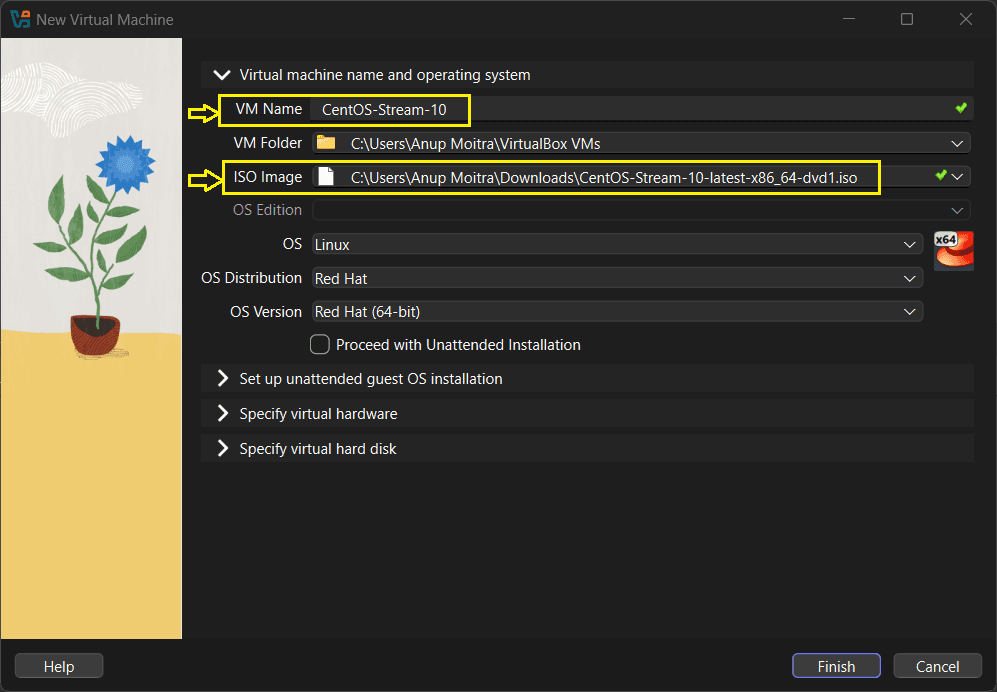
Create a New Virtual Machine
In VirtualBox Manager, select New. Use Name CentOS-Stream-10, Type Linux, Version Red Hat (64-bit).
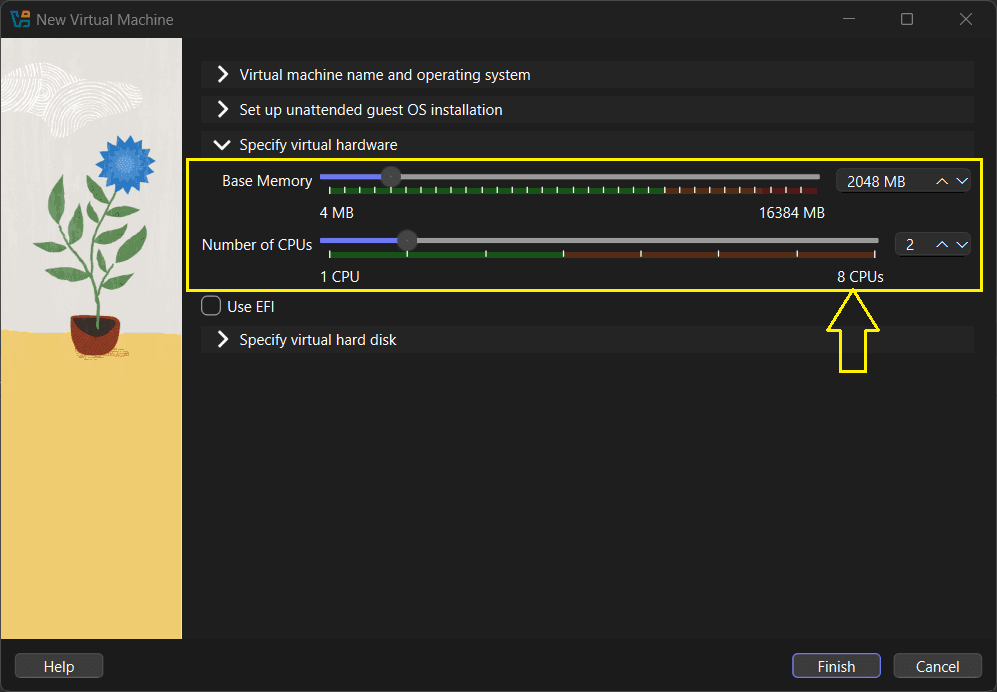
Memory and CPU Allocation
RAM: Allocate 2 to 4 GB for command-line only servers, or 4 to 8 GB for graphical desktop installations. CPUs: Start with 2 virtual CPUs and add more if your host system resources allow.
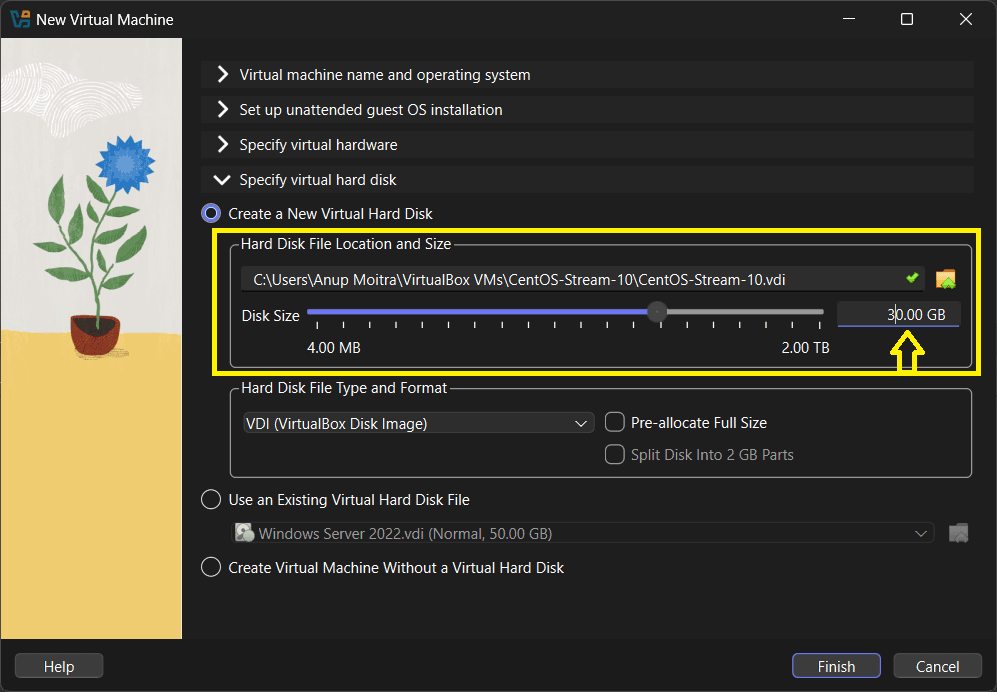
Virtual Disk Configuration
Create a VDI (VirtualBox Disk Image) disk, select dynamically allocated storage, and allocate 30 GB or more space. Keep the default SATA controller, or use NVMe if you installed the Extension Pack for better performance.
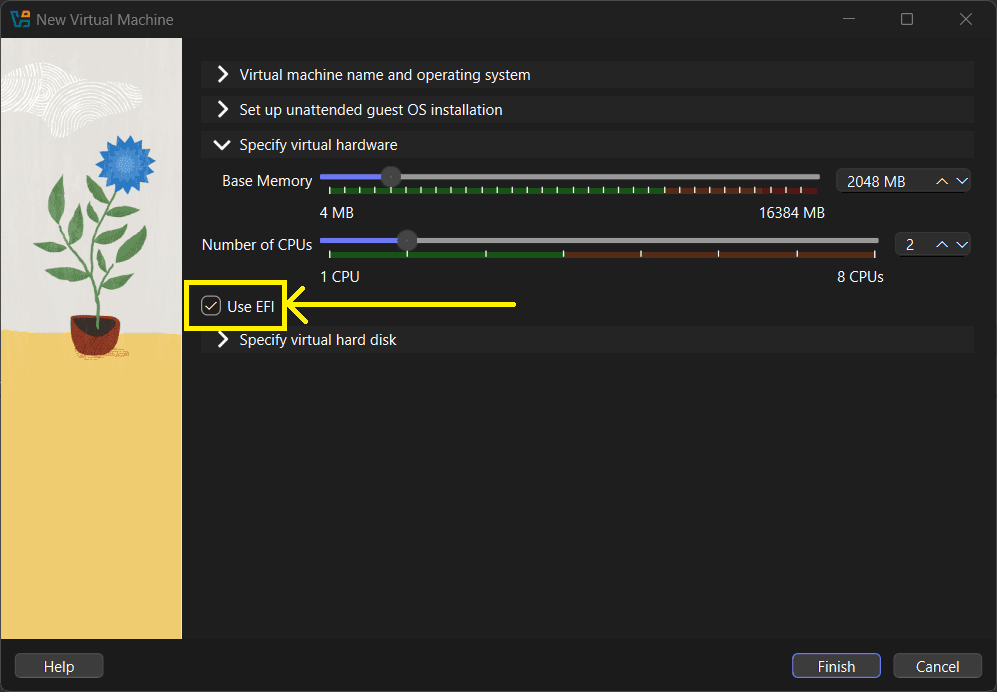
Firmware and Display Settings
Enable EFI (Unified Extensible Firmware Interface) under System → Motherboard. Set Video Memory to 128 MB. Optionally enable 3D Acceleration for better graphical performance.
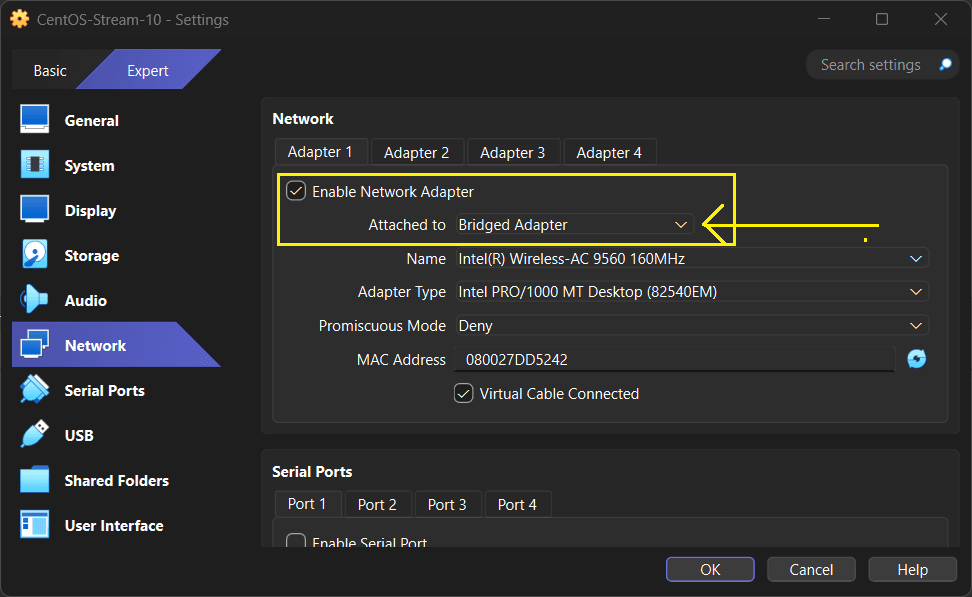
Networking Configuration
The default NAT (Network Address Translation) configuration works for outbound internet access. Use Bridged Adapter to give the virtual machine a direct IP address on your local network, allowing other devices to reach it. You can also configure NAT port forwarding later for specific services.
Step 4: Install CentOS Stream 10
Attach ISO and Start Installation
Open your virtual machine’s Settings → Storage and attach the CentOS Stream 10 ISO to the virtual Optical Drive. Start the virtual machine and choose Install CentOS Stream 10 from the boot menu.
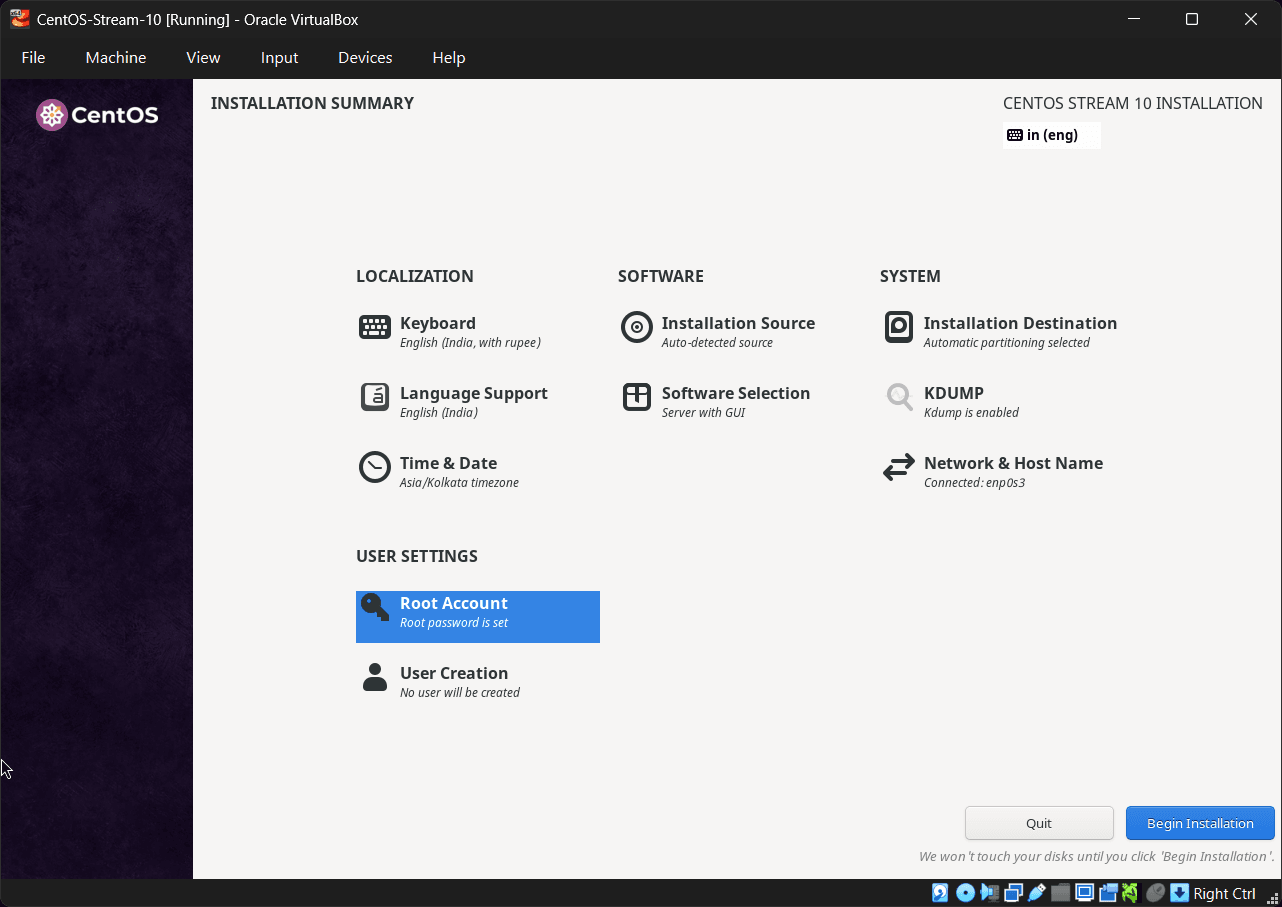
Language, Time, and Keyboard Configuration
Select your preferred language and keyboard layout. Configure the time zone according to your location if needed.
Installation Destination
Accept automatic partitioning for a standard lab virtual machine. Advanced users can customize Logical Volume Manager (LVM) and XFS filesystem layouts for specific requirements.
Software Selection
Choose Minimal Install for a lean server environment or Server with GUI for a full desktop experience. Additional software packages, including GNOME desktop environment, can be installed later if needed.
User Account and Security Configuration
Set a secure root password and create a non-root user account with administrator privileges by adding it to the wheel group.
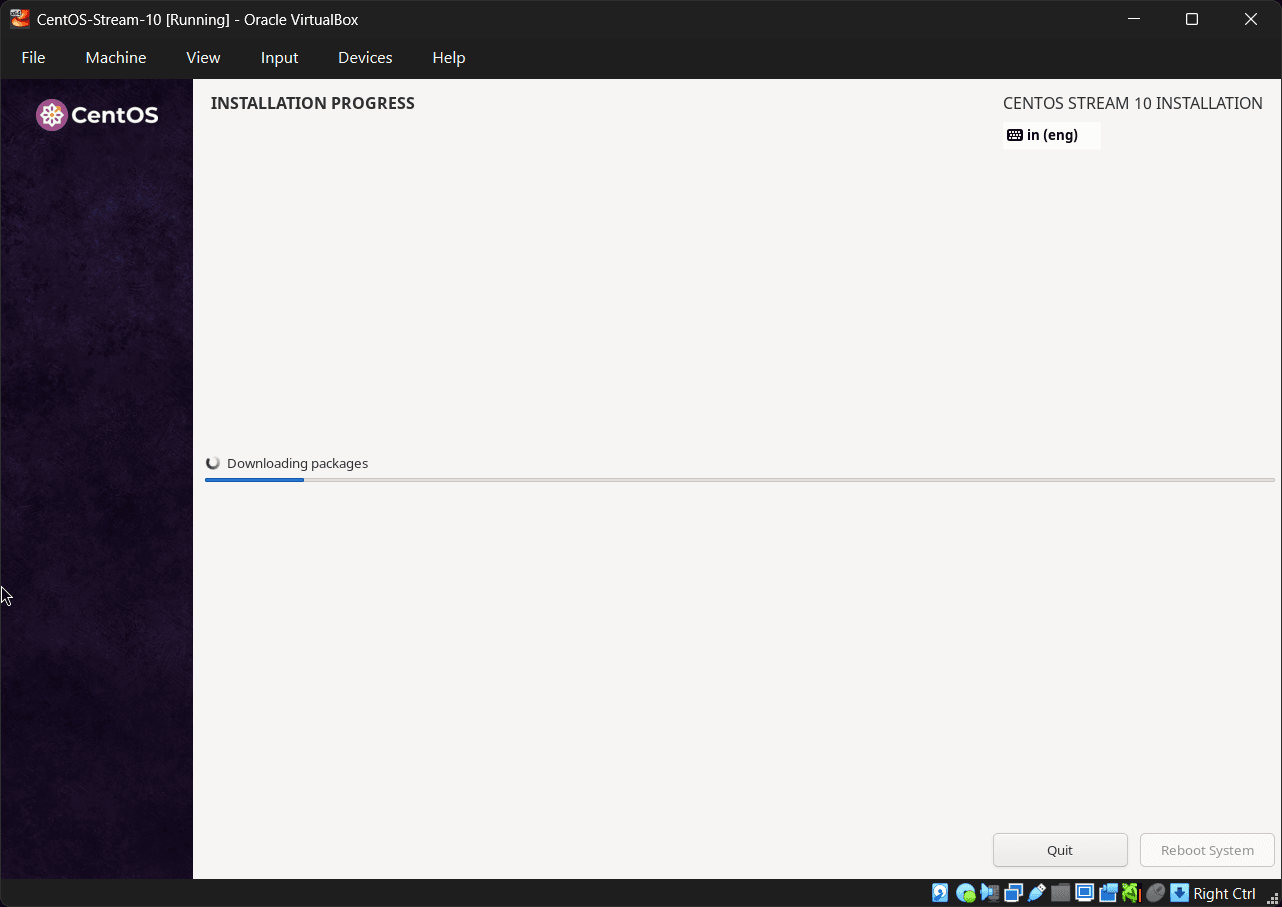
Begin Installation
Click Begin Installation to start the process. When installation completes, reboot into your new CentOS Stream 10 system.
Secure Boot consideration: If you enable Secure Boot in EFI settings, keep your system fully updated. Some third-party kernel modules, including VirtualBox Guest Additions, may require additional module signing or temporarily disabling Secure Boot during installation.
Step 5: First Boot, System Updates and Essential Packages
After first login, update your system and install essential tools:
# Update all system packages, then reboot if a new kernel is installed
sudo dnf update -y
sudo reboot

# Install essential utilities
sudo dnf install -y vim git curl wget
Enable EPEL Repository (Optional but Recommended)
The Extra Packages for Enterprise Linux (EPEL) repository provides additional software packages:
# Enable CRB (CodeReady Builder) repository for dependencies
sudo dnf config-manager --set-enabled crb

# Install EPEL for extra packages
sudo dnf install -y https://dl.fedoraproject.org/pub/epel/epel-release-latest-10.noarch.rpm
Why enable EPEL: Many useful tools, including DKMS (Dynamic Kernel Module Support), are available in EPEL. It is a trusted, community-maintained repository specifically for Enterprise Linux distributions.
Step 6: Install VirtualBox Guest Additions
Guest Additions enhance virtual machine integration with features like automatic display resizing, shared clipboard, shared folders, and improved pointer integration.
Insert the Guest Additions CD Image
In the running virtual machine window, open Devices → Insert Guest Additions CD image…
Install Development Tools and Kernel Headers
# Install development toolchain
sudo dnf groupinstall -y "Development Tools"

# Install kernel development packages and dependencies
sudo dnf install -y kernel-devel kernel-headers gcc make perl bzip2 elfutils-libelf-devel

# Optional: Install DKMS to automatically rebuild modules after kernel updates
sudo dnf install -y dkms
Run the Guest Additions Installer
# Create mount point and mount the Guest Additions CD
sudo mkdir -p /mnt/vbox
sudo mount /dev/cdrom /mnt/vbox

# Execute the installer script
sudo sh /mnt/vbox/VBoxLinuxAdditions.run

# Reboot to activate the new modules
sudo reboot
Important tip: If you recently updated the kernel, reboot before installing Guest Additions to ensure the running kernel version matches the installed kernel-devel packages.
Troubleshooting Common Issues
Only 32-bit Options or VT-x/AMD-V Not Available
Enable virtualization technology in your BIOS or UEFI firmware settings and disable other hypervisors such as Hyper-V, WSL2 Hyper-V backend, and VMware. A host system reboot is required after these changes.
Apple Silicon Compatibility
Use aarch64 architecture ISOs exclusively. x86_64 guests cannot run natively on Apple Silicon processors in VirtualBox.
USB Device Passthrough Issues
Install the matching VirtualBox Extension Pack and add your user account to the appropriate host system group, such as vboxusers on Linux hosts.
Display Resolution and Resizing Problems
Confirm that Guest Additions are properly installed and increase video memory allocation to 128 MB. Experiment with enabling or disabling 3D Acceleration settings.
Frequently Asked Questions
Which ISO should I choose, DVD or Boot?
How much RAM and CPU should I assign to my virtual machine?
Do I need to enable EFI for my virtual machine?
Guest Additions failed to compile. What should I do now?
kernel-devel package version. After performing a dnf update, always reboot before attempting to install Guest Additions. Verify that all required build tools and kernel headers are installed as shown in the guide.Is CentOS Stream 10 suitable for production environments?
Conclusion: Your CentOS Stream 10 Lab Environment Is Ready
You now have a fully configured CentOS Stream 10 virtual machine running on VirtualBox, providing an ideal platform for learning Linux system administration, testing server software stacks, and developing applications in an enterprise-like environment.
Quick Installation Reference
- Install VirtualBox and the Extension Pack
- Download and verify the CentOS Stream 10 ISO image
- Create the virtual machine with EFI enabled, 2 virtual CPUs, 4 to 8 GB RAM, and 30 GB or more disk space
- Install CentOS Stream 10, run
sudo dnf update -y, then install essential packages - Optional: Enable EPEL repository, install Guest Additions, configure shared folders, and set up port forwarding