
Block USB Storage in Intune: 2 Easy Methods
USB flash drives are small, easy to lose, and a simple way for sensitive company data to leave the organisation. They can also introduce malware, unwanted tools, or unapproved files when plugged into a managed device. If your Windows devices are managed by Microsoft Intune, you can block USB storage in a few minutes, without touching each device manually.
What Happens When You Block USB Storage in Intune
Before you block USB storage in Intune, it helps to understand exactly what the restriction targets and what it leaves untouched. This is one of the most common points of confusion for admins who are new to Intune endpoint security. The settings in this guide control removable storage access. They do not disable the physical USB ports, and they do not block every USB device connected to the computer.
The policy targets Windows removable storage classes: USB flash drives, external hard drives, portable SSDs, SD card readers, and other removable media that Windows presents as storage.
USB input devices such as keyboards, mice, webcams, and headsets use different device classes. A removable storage access policy does not block normal keyboard or mouse use.
Full block versus write block only
The two methods covered in this guide behave differently depending on which setting you use:
| Setting | Blocks read | Blocks write | Result |
|---|---|---|---|
| All Removable Storage classes: Deny all access | Yes | Yes | Drive is completely inaccessible |
| Removable Disk: Deny Write Access | No | Yes | Drive can be read, but files cannot be copied to it |
For most organisations, a full block is the better starting point because it prevents both reading from and writing to removable storage. If you need to allow users to read from a USB drive but prevent them from copying company data to it, the Deny Write Access approach gives you that flexibility.
The full block setting takes precedence over individual removable storage settings. Do not combine full-block and write-only policies on the same devices unless you have a clear reason and have tested the result.
Prerequisites
Before you block USB storage in Intune, confirm the following are in place:
- Windows 10 or Windows 11 devices enrolled in Microsoft Intune
- An appropriate Intune role, such as Intune Administrator, Endpoint Security Manager, or Policy and Profile Manager
- A Microsoft Entra ID security group containing the Windows devices you want to target
- A USB flash drive available for testing after the policy applies
The Settings Catalog method to block USB storage in Intune does not require Microsoft Defender for Endpoint onboarding. The Attack Surface Reduction method is created from the Endpoint security area of Intune, and Microsoft documents Defender Antivirus as the primary antivirus prerequisite for Attack Surface Reduction profiles. If you plan to use advanced Defender Device Control features such as reusable device groups, granular allow/deny rules, auditing, or advanced reporting, review your Microsoft Defender for Endpoint licensing requirements before production deployment.
Method 1: Settings Catalog RECOMMENDED
The Settings Catalog is the cleanest way to block USB storage in Intune. It uses a Windows Administrative Templates setting exposed through Intune and applies a full block across removable storage classes.
- 1
Create a new configuration policy
Sign in to the Microsoft Intune admin center and navigate to:
Devices›Manage devices›Configuration›Create›New policy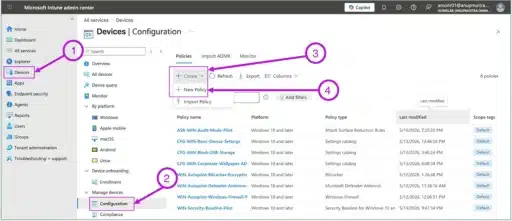
- 2
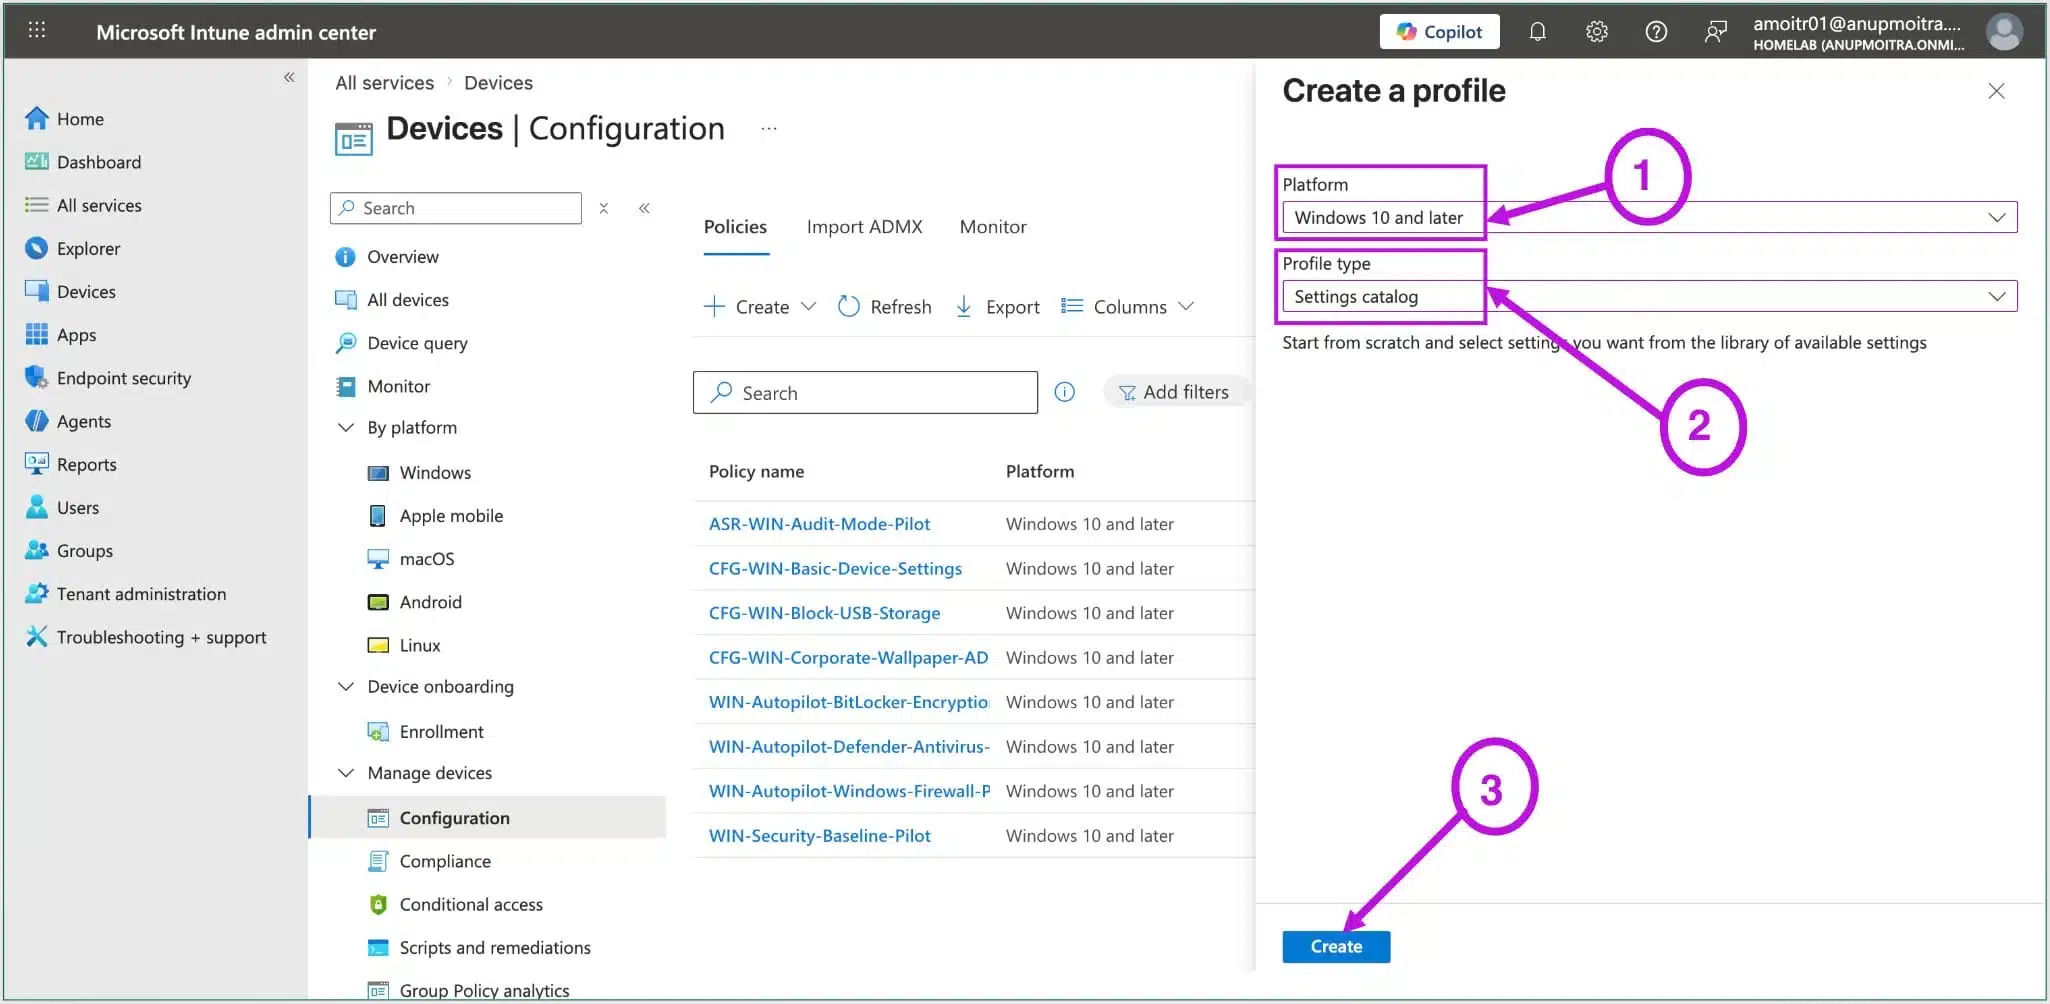
Select platform and profile type
On the Create a policy screen, configure the following and click Create:
- Platform: Windows 10 and later
- Profile type: Settings catalog
- 3
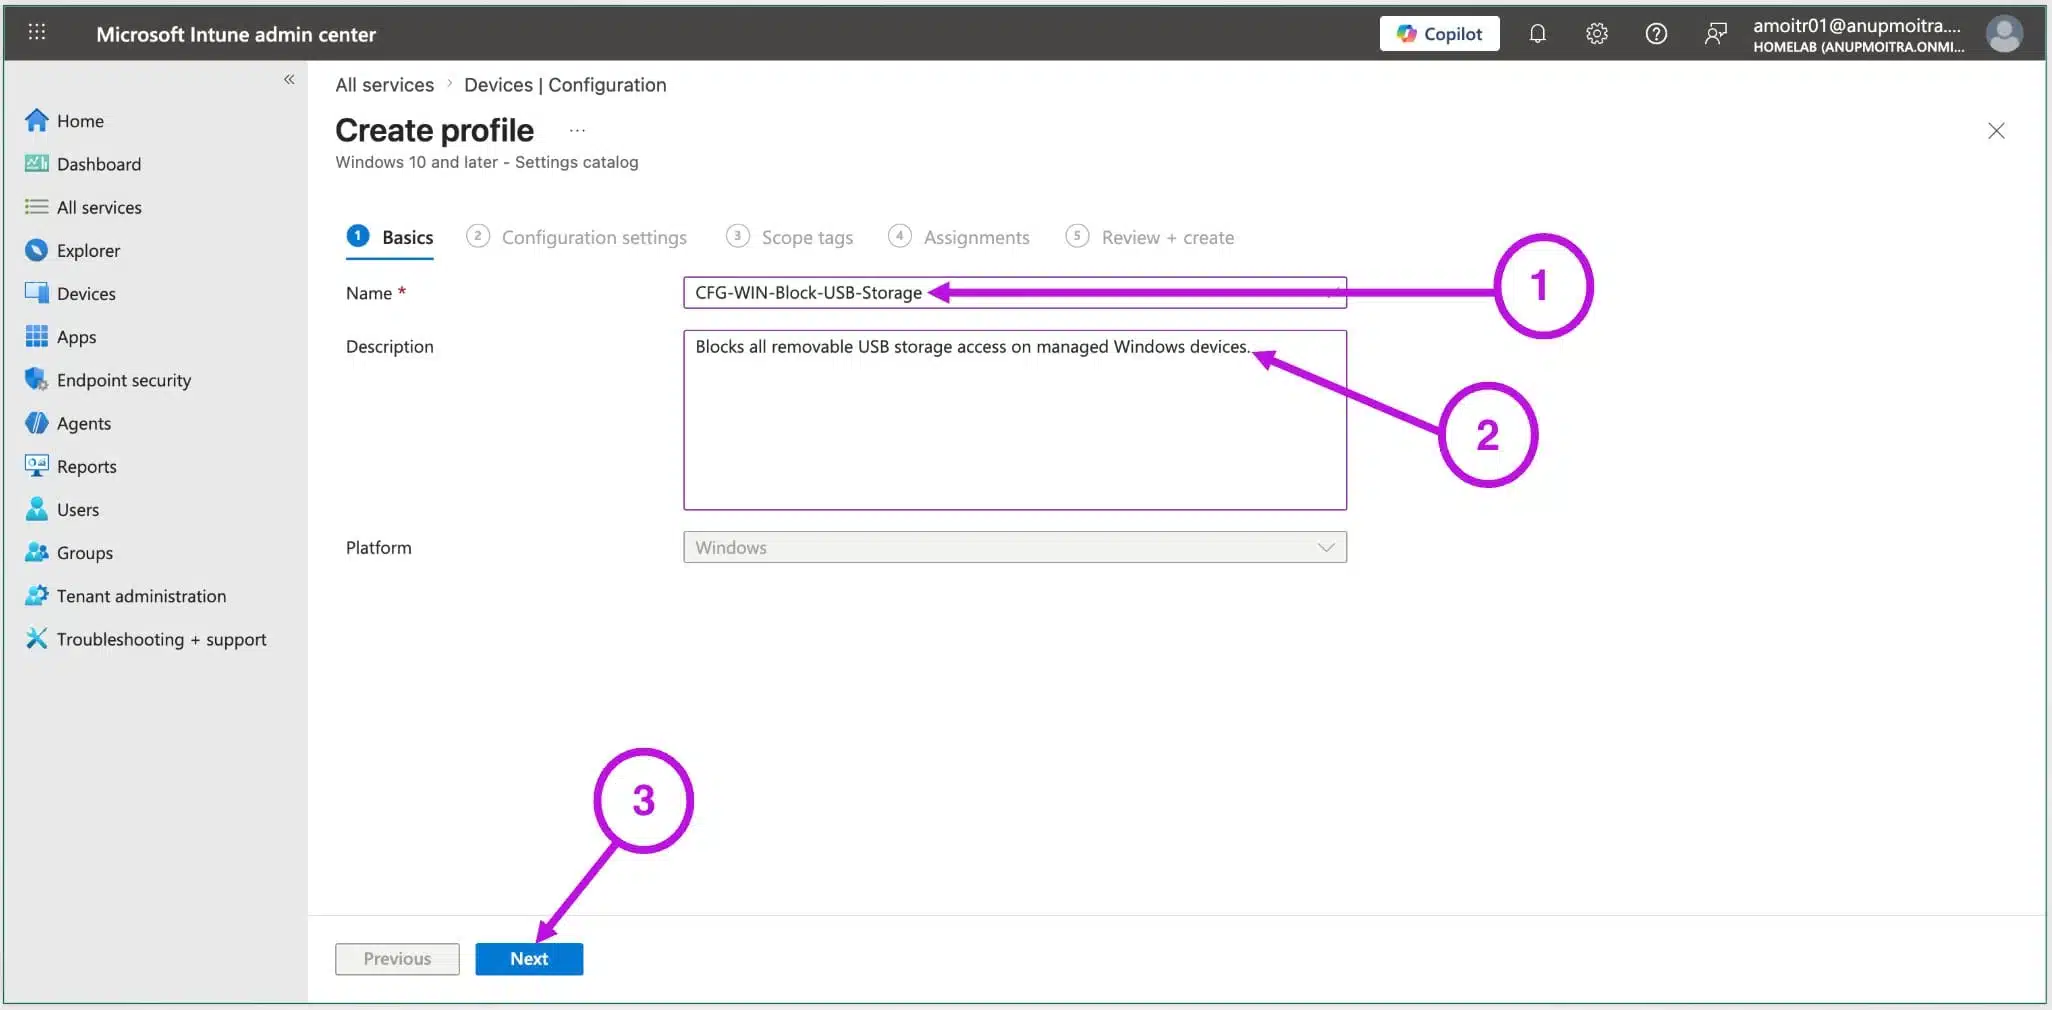
Name the policy
On the Basics tab, give the policy a clear name your team will recognise. A consistent naming convention makes policies easier to manage as your Intune environment grows.
- Name:
CFG-WIN-Block-USB-Storage - Description: Blocks all removable USB storage access on managed Windows devices.
Click Next.
- Name:
- 4
Add the setting
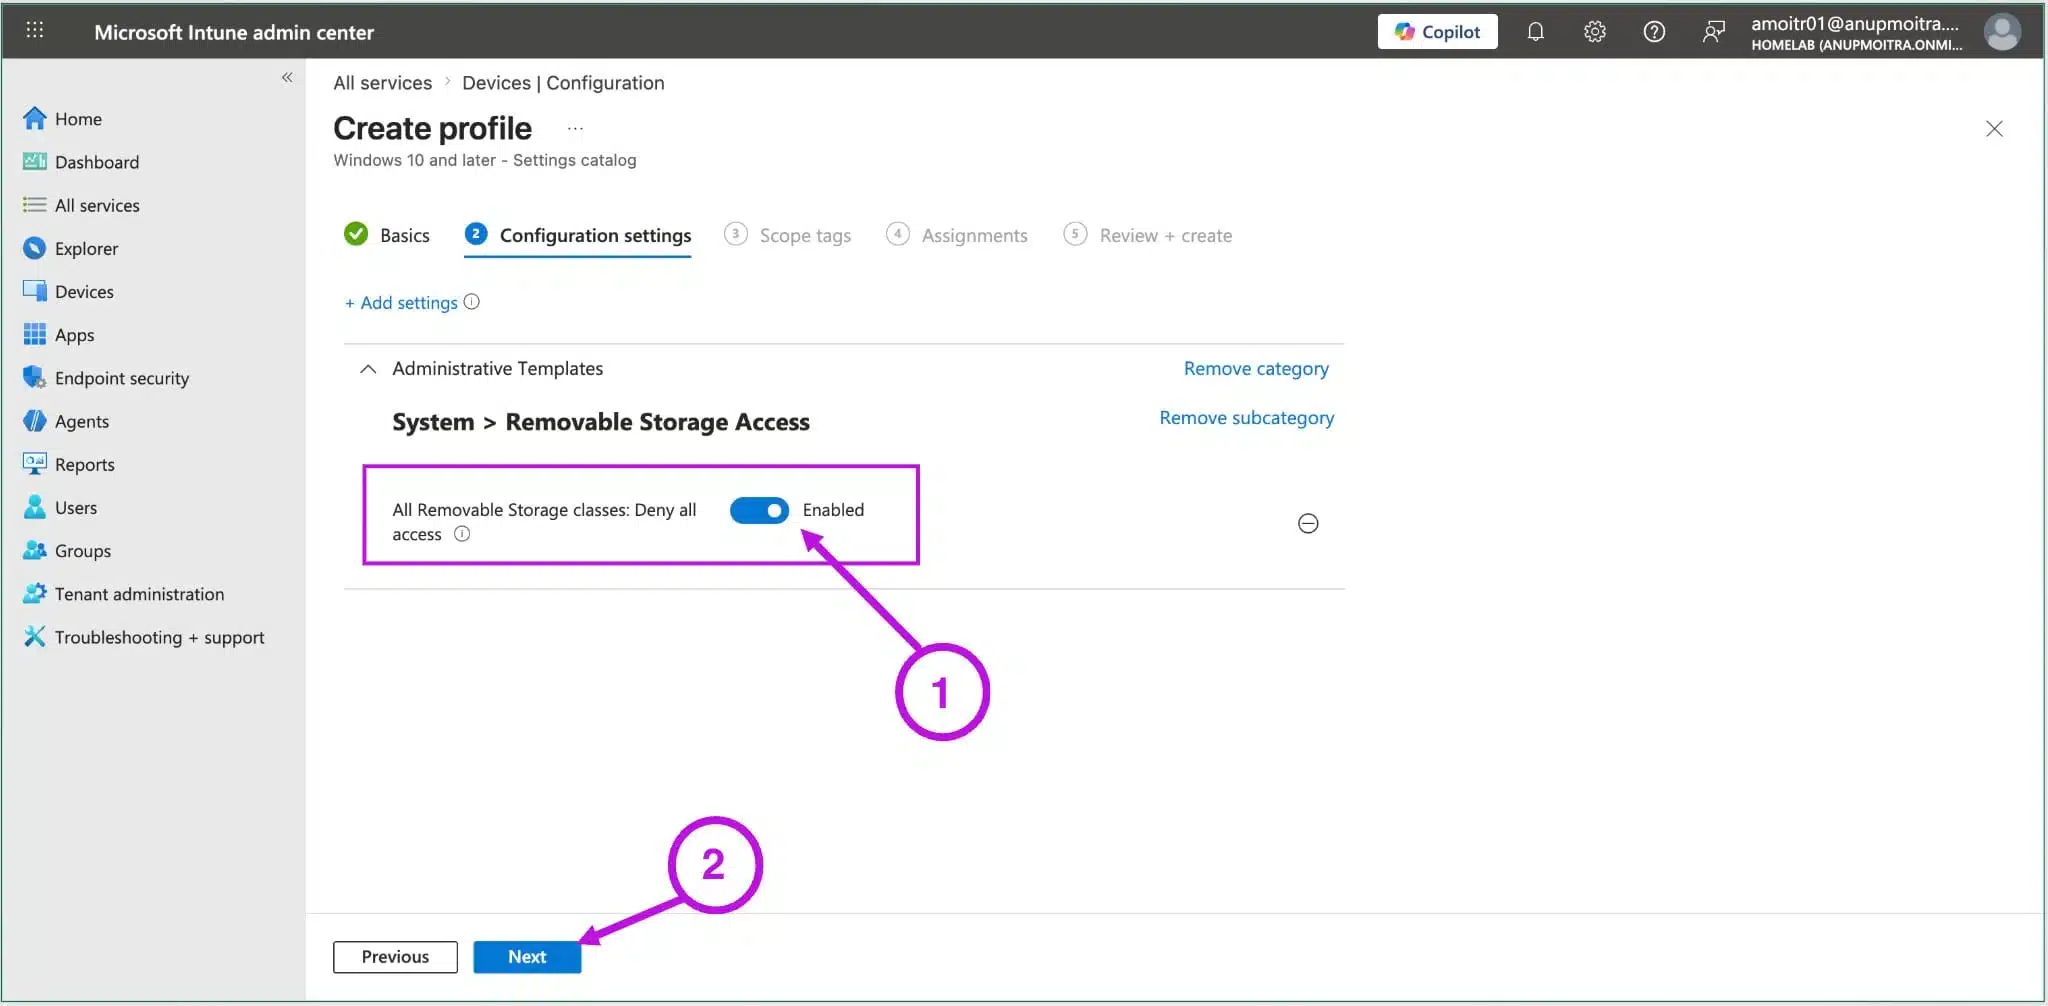
On the Configuration settings tab, click Add settings. The Settings picker opens on the right. Search, or browse to:
Administrative Templates›System›Removable Storage AccessFind All Removable Storage classes: Deny all access and add it to the policy.
Device scope tipIf Intune shows both user-scoped and device-scoped versions of the setting, choose the device-scoped setting. When you block USB storage in Intune, the restriction should apply to the device, not only to a specific signed-in user.
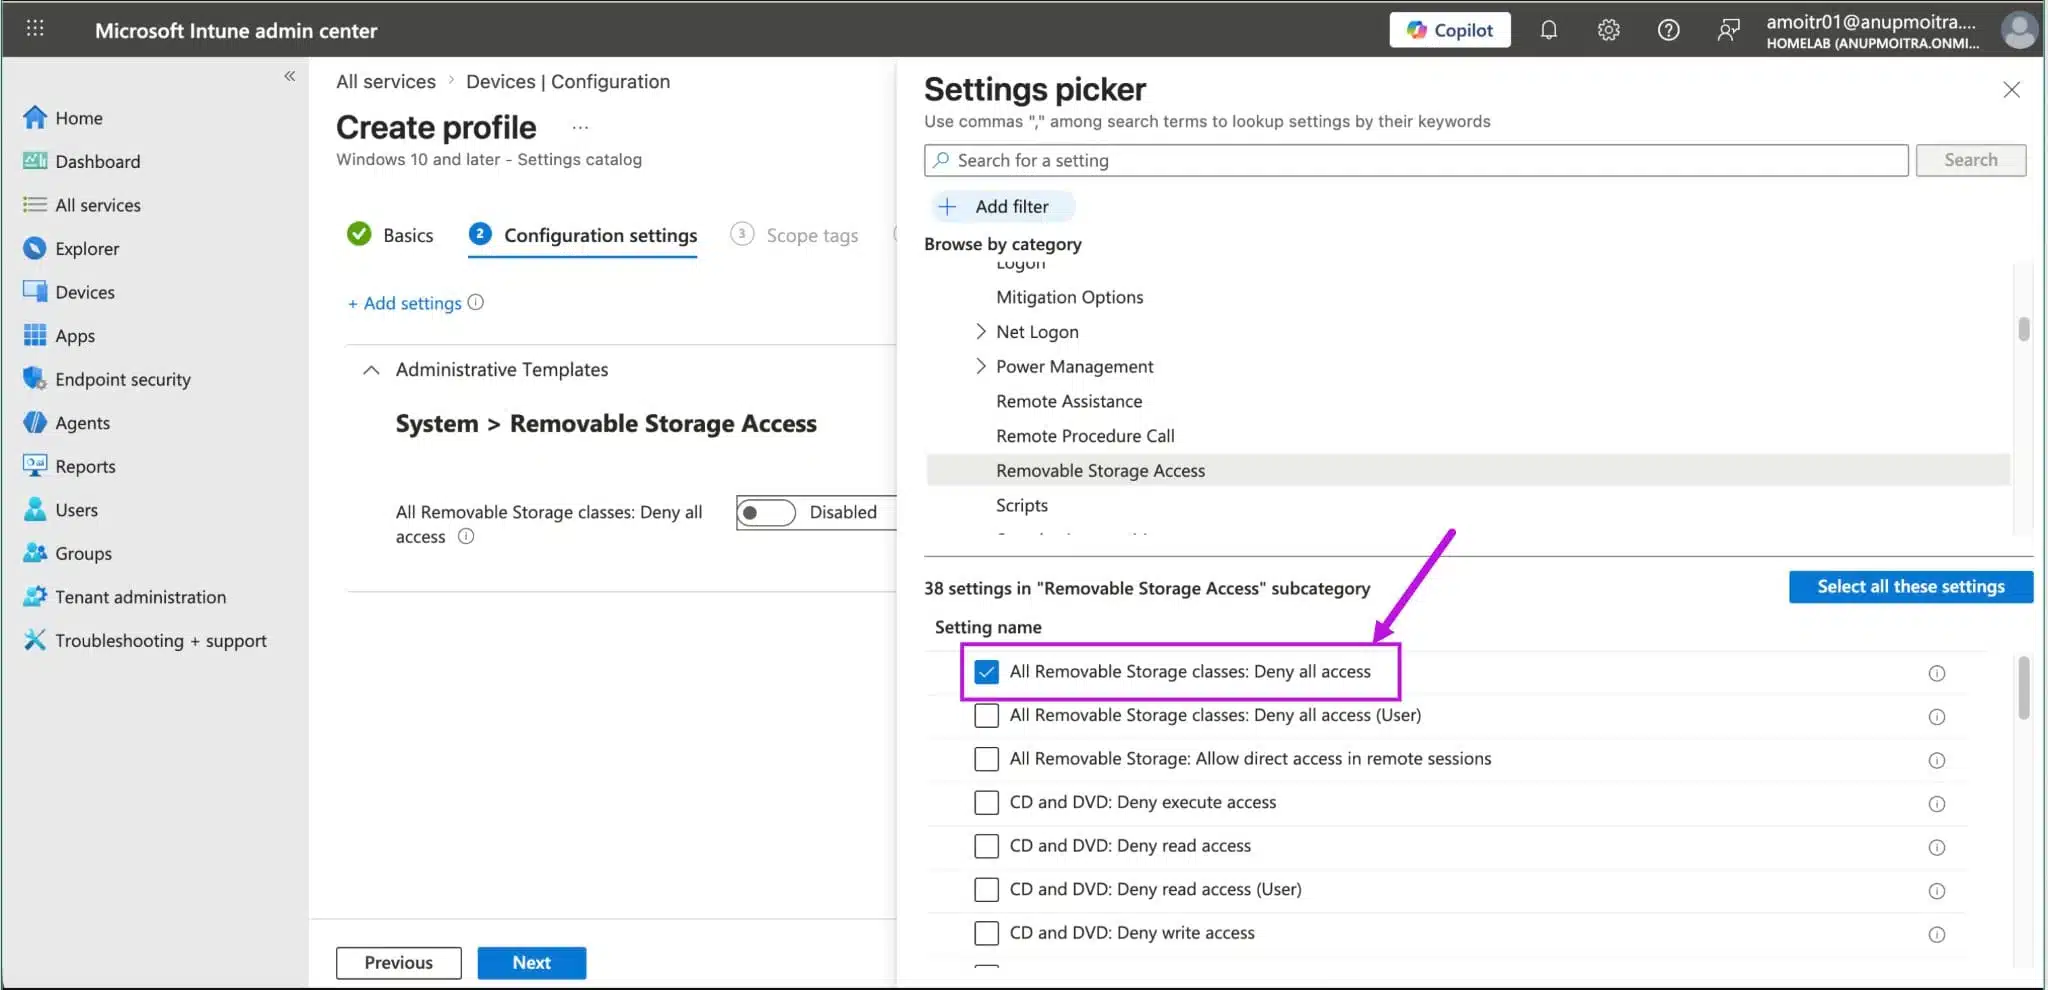
Back on the Configuration settings tab, set the value to Enabled and click Next.
- 5
Assign and create
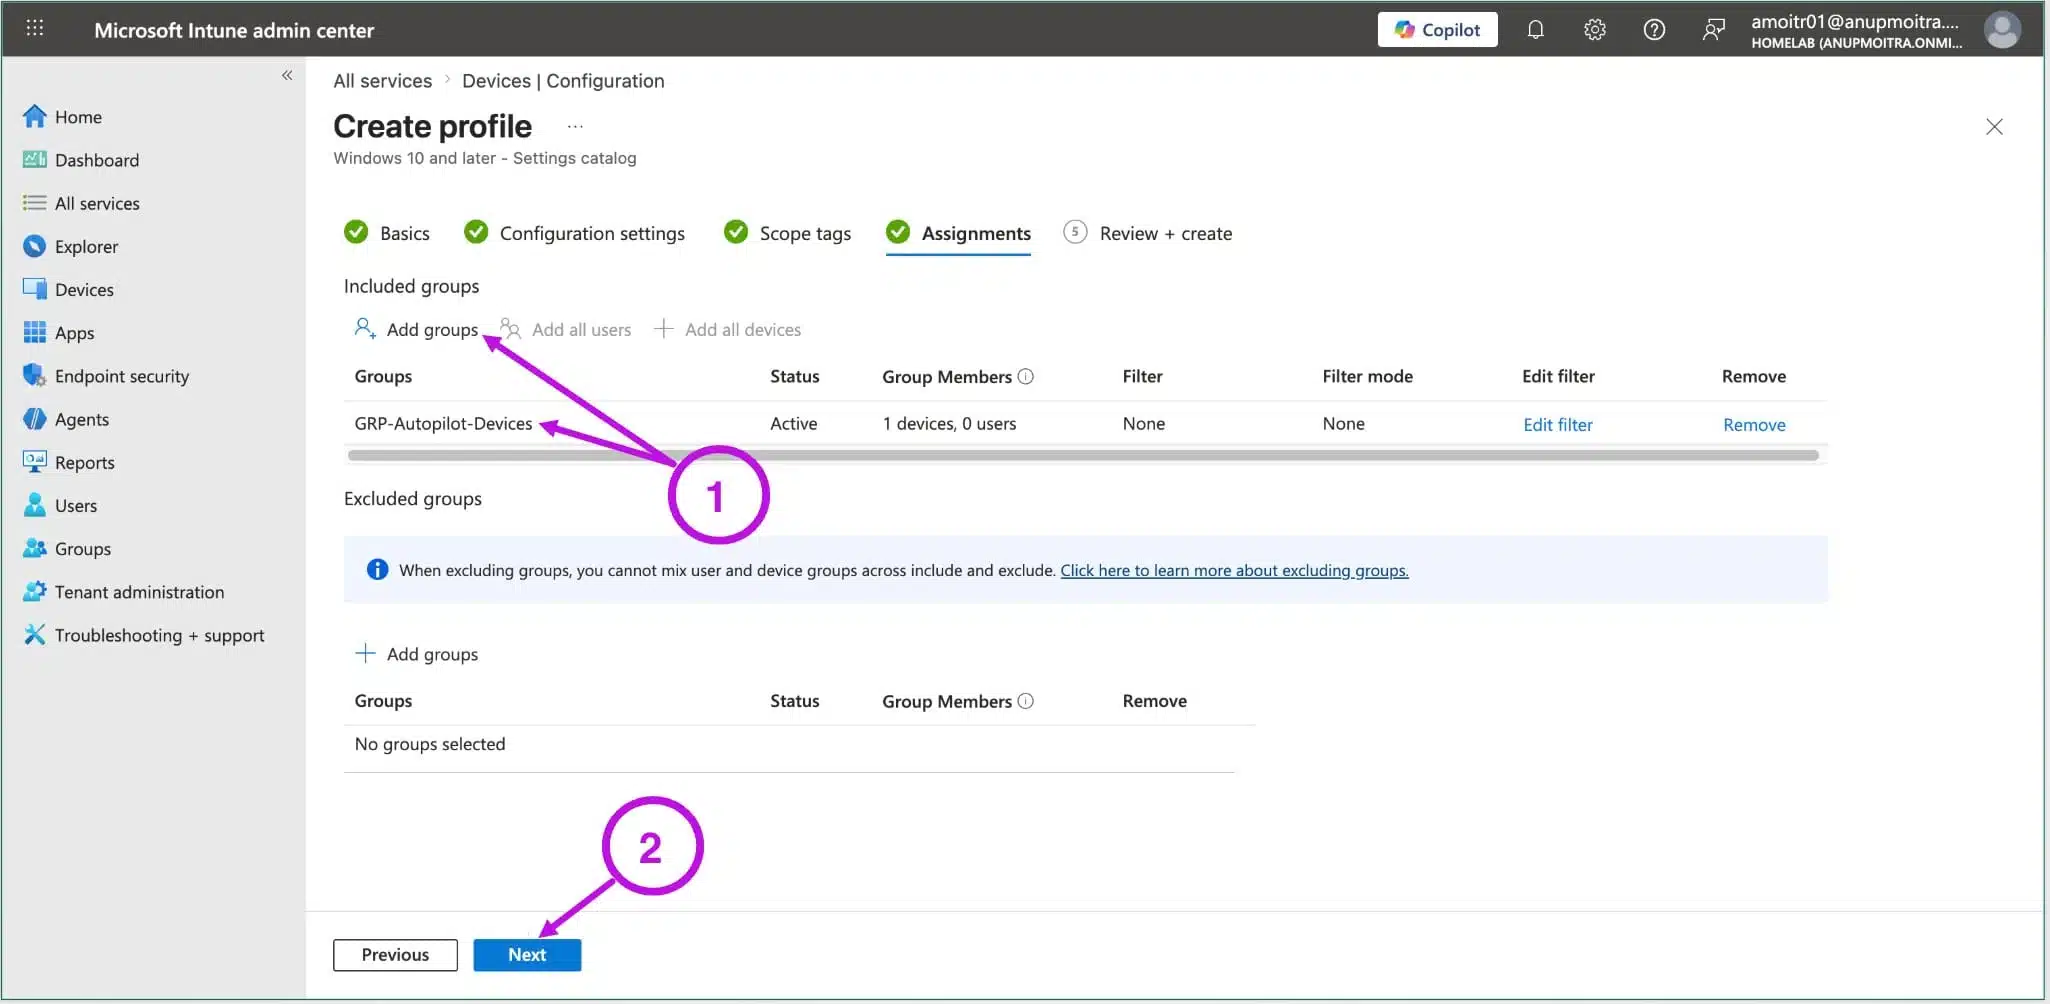
On the Assignments tab, click Add groups under Included groups and select your target Windows device group. Click through Scope tags, review the summary, and click Create.
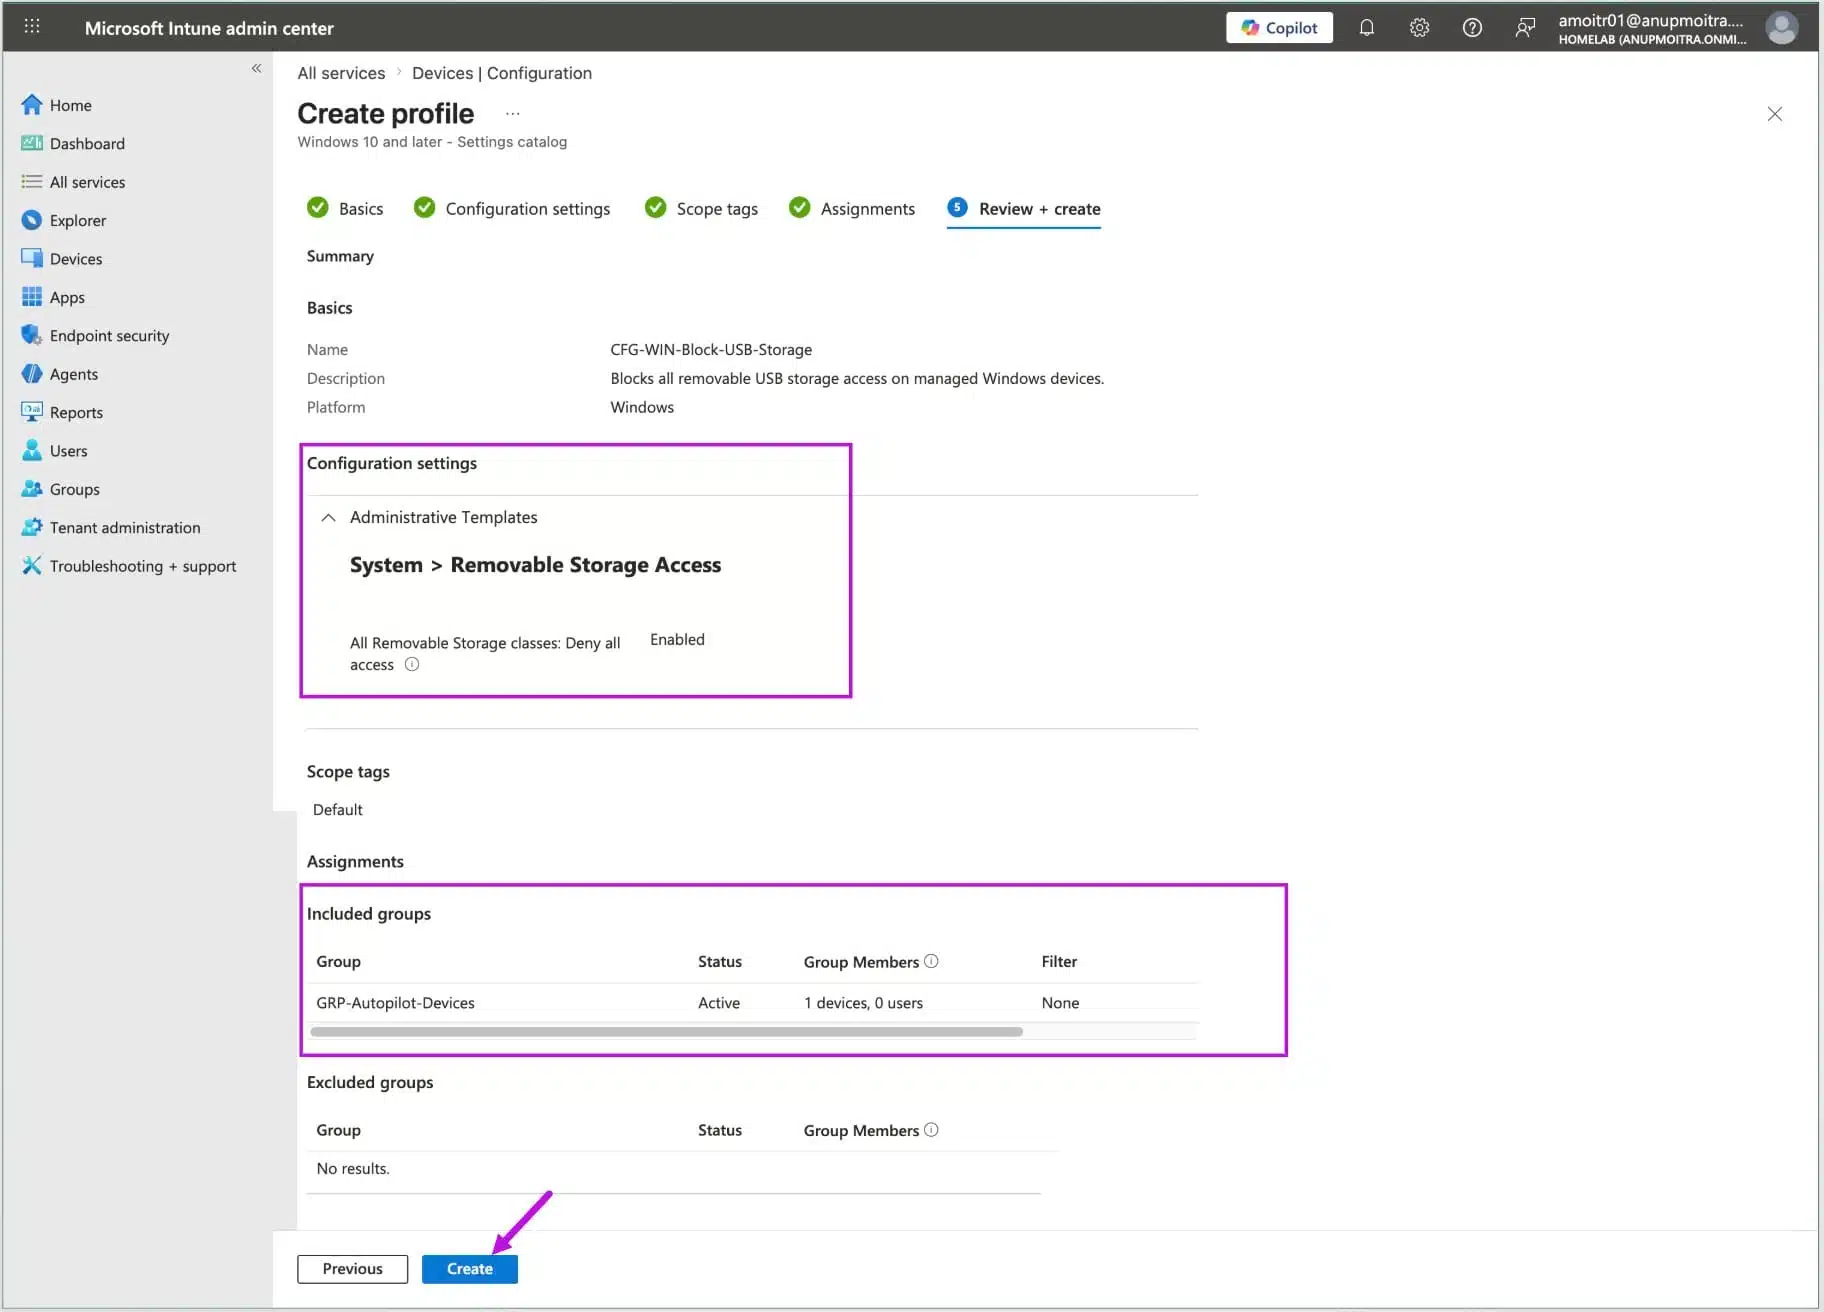
The policy is now created and will be delivered to devices in the assigned group when they next check in with Intune.
Method 2: Attack Surface Reduction WRITE-ONLY BLOCK
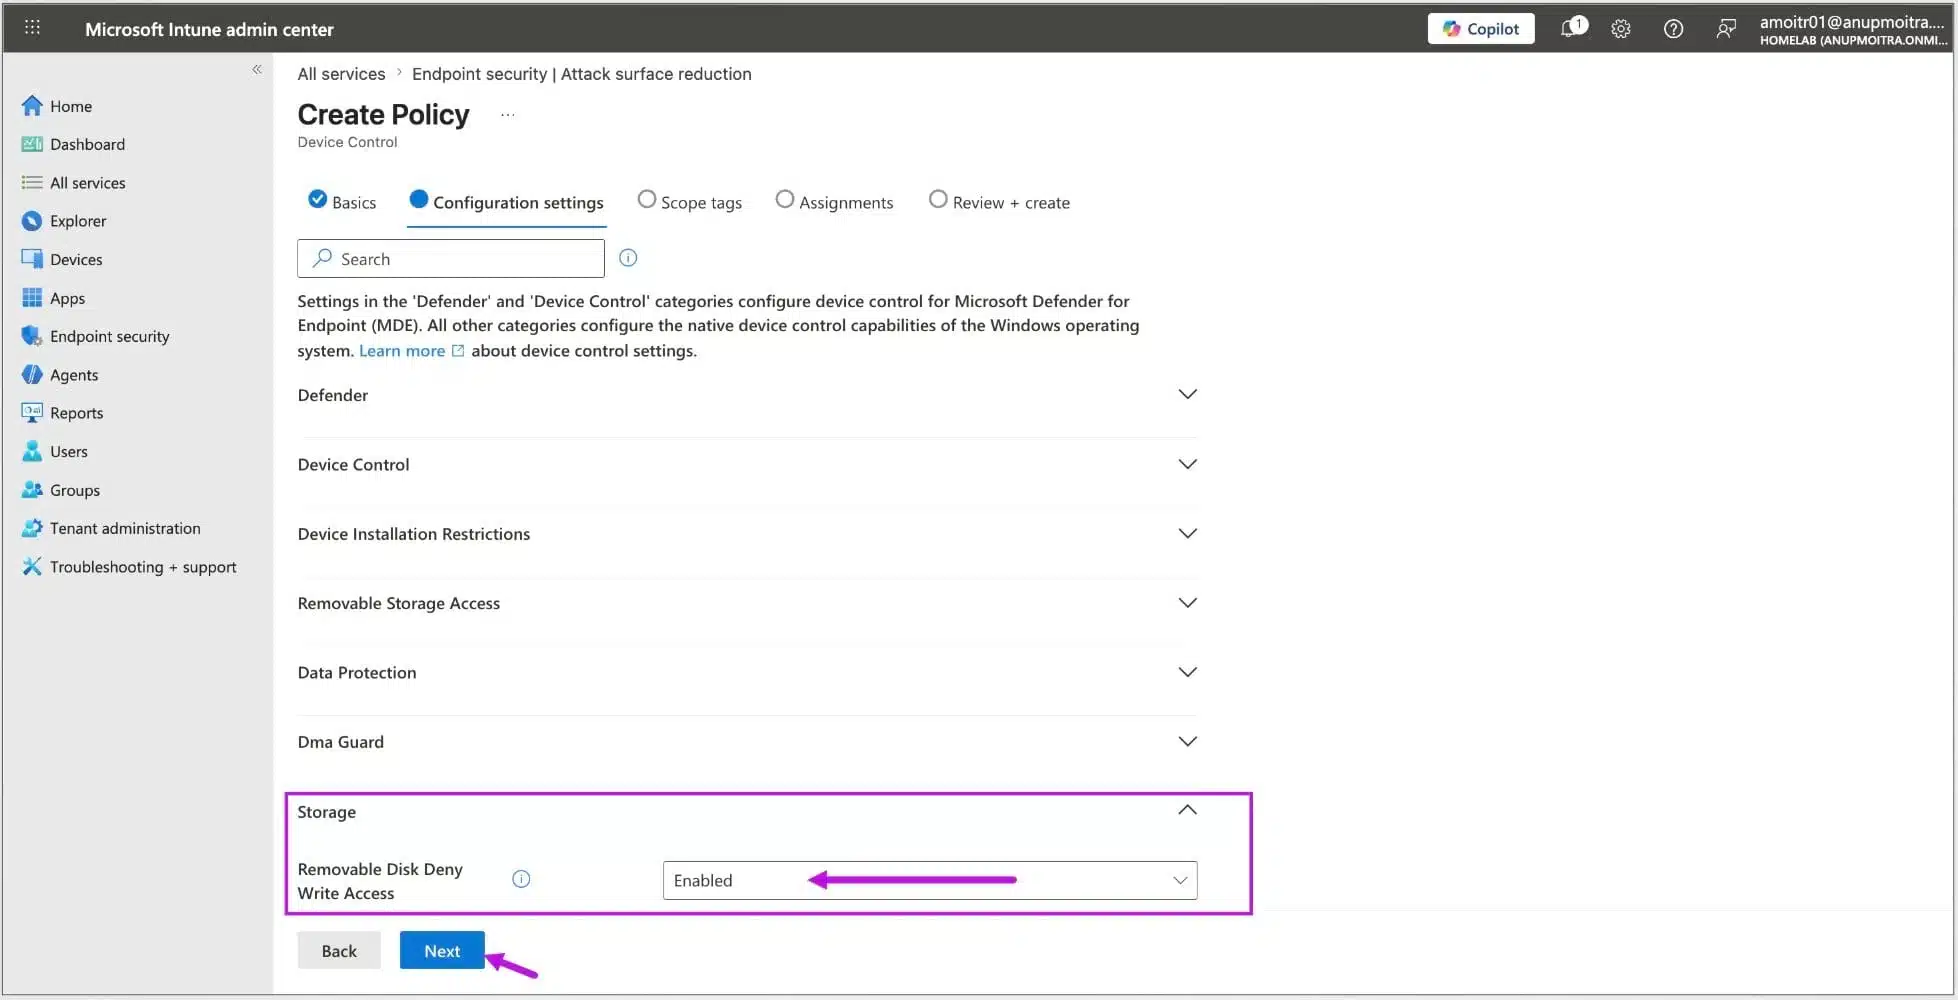
This method uses the Endpoint security area of Intune rather than a standard Configuration profile. It's the right approach if you want to block write access to USB drives but still allow users to read from them, or if you're already managing removable media as part of a broader Attack Surface Reduction strategy.
For Attack Surface Reduction profiles, Microsoft documents Defender Antivirus as the primary antivirus prerequisite on Windows devices. If you only need a full USB storage block, Method 1 is simpler.
- 1
Navigate to Attack Surface Reduction
Endpoint security›Attack surface reduction›Create Policy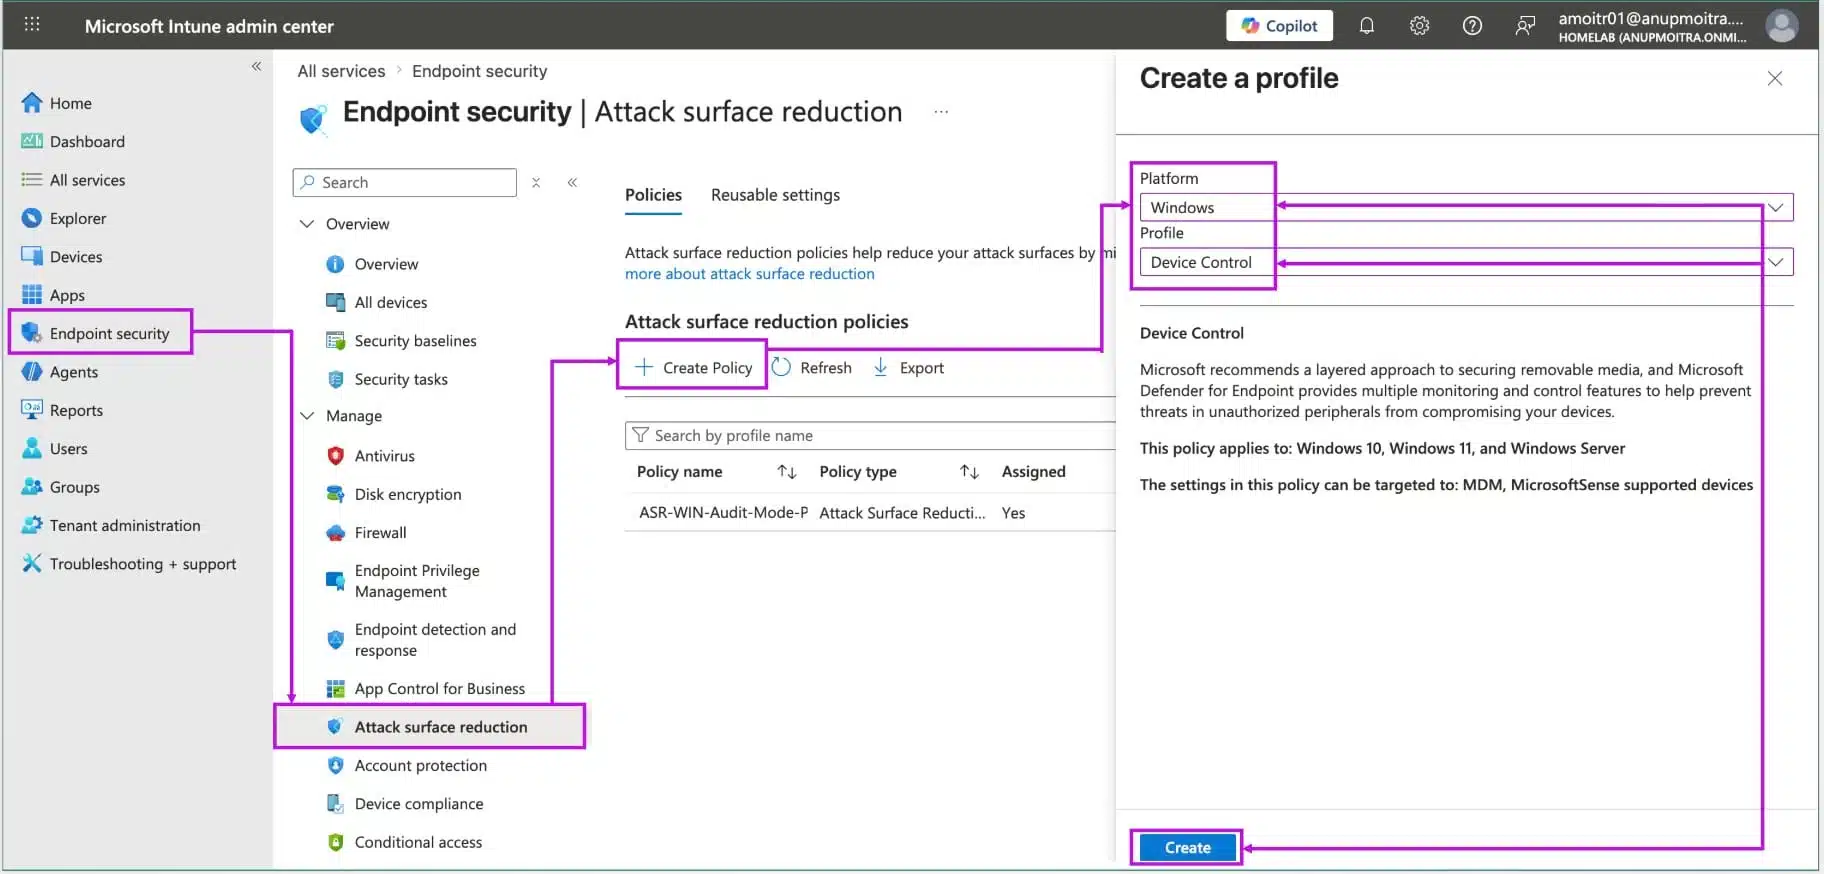
- 2
Select platform and profile
- Platform: Windows
- Profile: Device Control
Click Create.
- 3
Name the policy and configure the setting
Give the policy a descriptive name on the Basics tab. On Configuration settings, expand the Storage category and locate Removable Disk: Deny Write Access. Set this to Enabled.
ImportantThe setting is called Deny Write Access, so setting it to Enabled means you are enabling the denial. In simple terms: Enabled = write access is blocked. Disabled or Not configured means write access is allowed by default.
- 4
Assign and create
On the Assignments tab, add your target Windows device group, click through Scope tags, review the summary, and click Create.
Assigning the Policy to the Right Group
One of the most important decisions when you block USB storage in Intune is whether to assign the policy to a device group or a user group. For USB storage blocking, a device group is the recommended choice.
Here's why: a USB storage block is a machine-level security control. The goal is for the restriction to apply to that Windows device regardless of who signs in. Device targeting makes the policy easier to understand, easier to report on, and easier to exclude cleanly when a specific device needs an exception.
Intune can apply device-scoped settings through different assignment types, but using a device group avoids confusion around sign-in timing and user-to-device relationships. Keep the design simple: include a device group and, if needed, exclude a device group.
| Assignment type | How it works | Recommended for USB block? |
|---|---|---|
| Device group | Policy assignment is based on the device object. Best when the setting should apply to the machine regardless of who signs in. | Yes |
| User group | Policy assignment follows the user. Useful for user-specific settings, but not the cleanest design for a device-wide USB restriction. | No |
Always start with a small pilot device group rather than assigning to all devices immediately. Deploy to a handful of test machines, confirm the block works as expected, check that no legitimate business workflows are disrupted, and then expand the assignment to the full fleet.
Some users or teams may legitimately need removable storage access, such as an IT technician who uses a bootable USB drive or a team that receives data files from an external partner on a physical drive. Identify these exceptions before you block USB storage across the full fleet.
Verifying the Policy Applied in Intune
After creating the policy and waiting for the device to check in, confirm that it was received and processed successfully. Navigate to:
The report can show Succeeded, Error, Conflict, Pending, or Not applicable. For a successful test deployment, the target device should show Succeeded with no Error or Conflict.
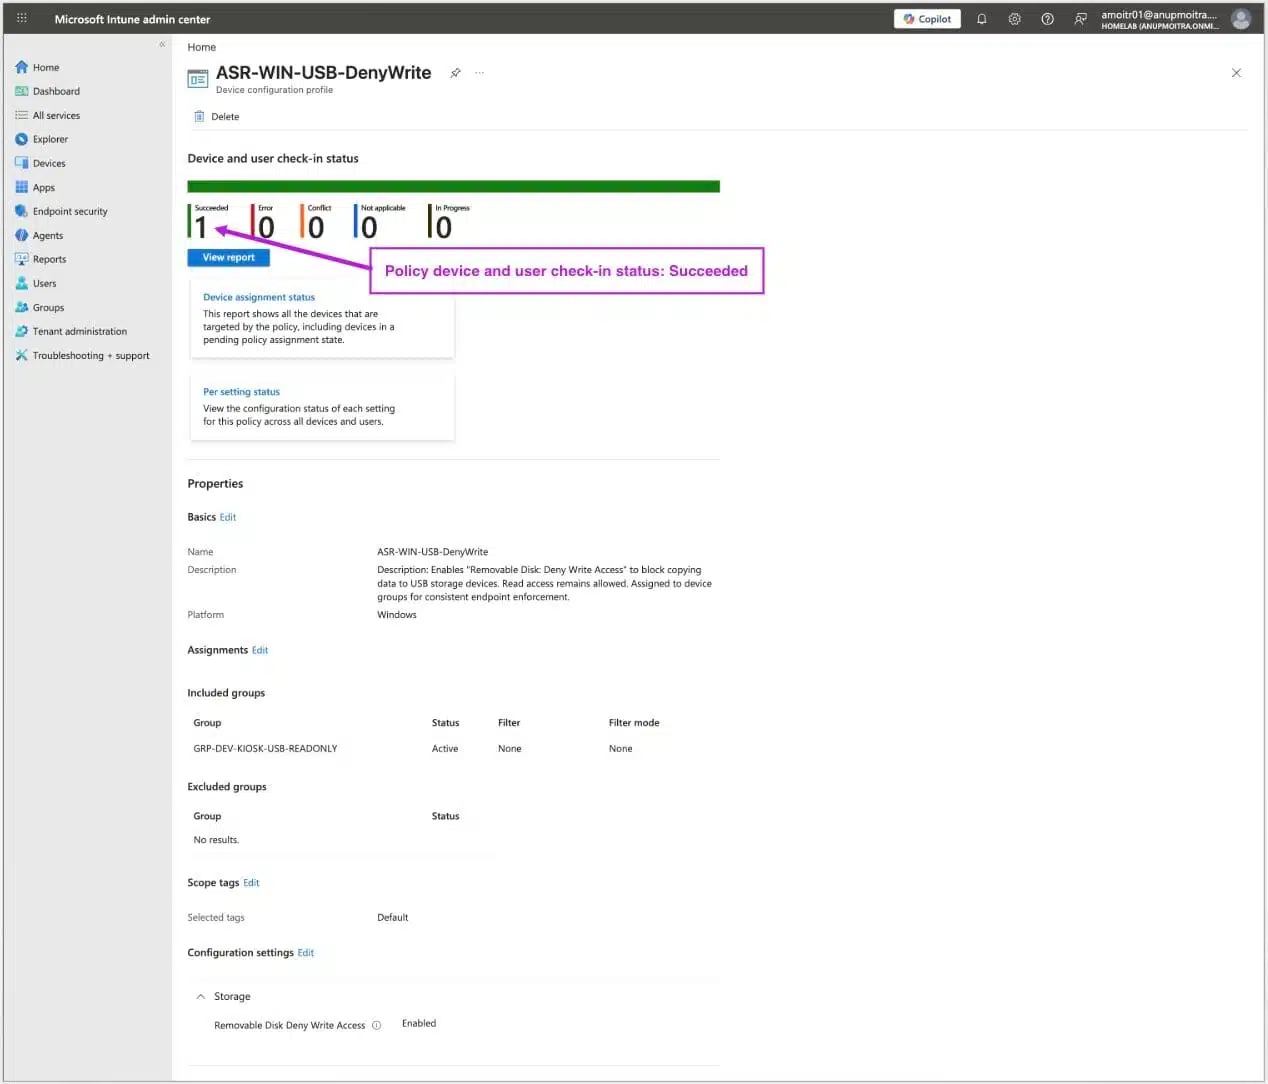
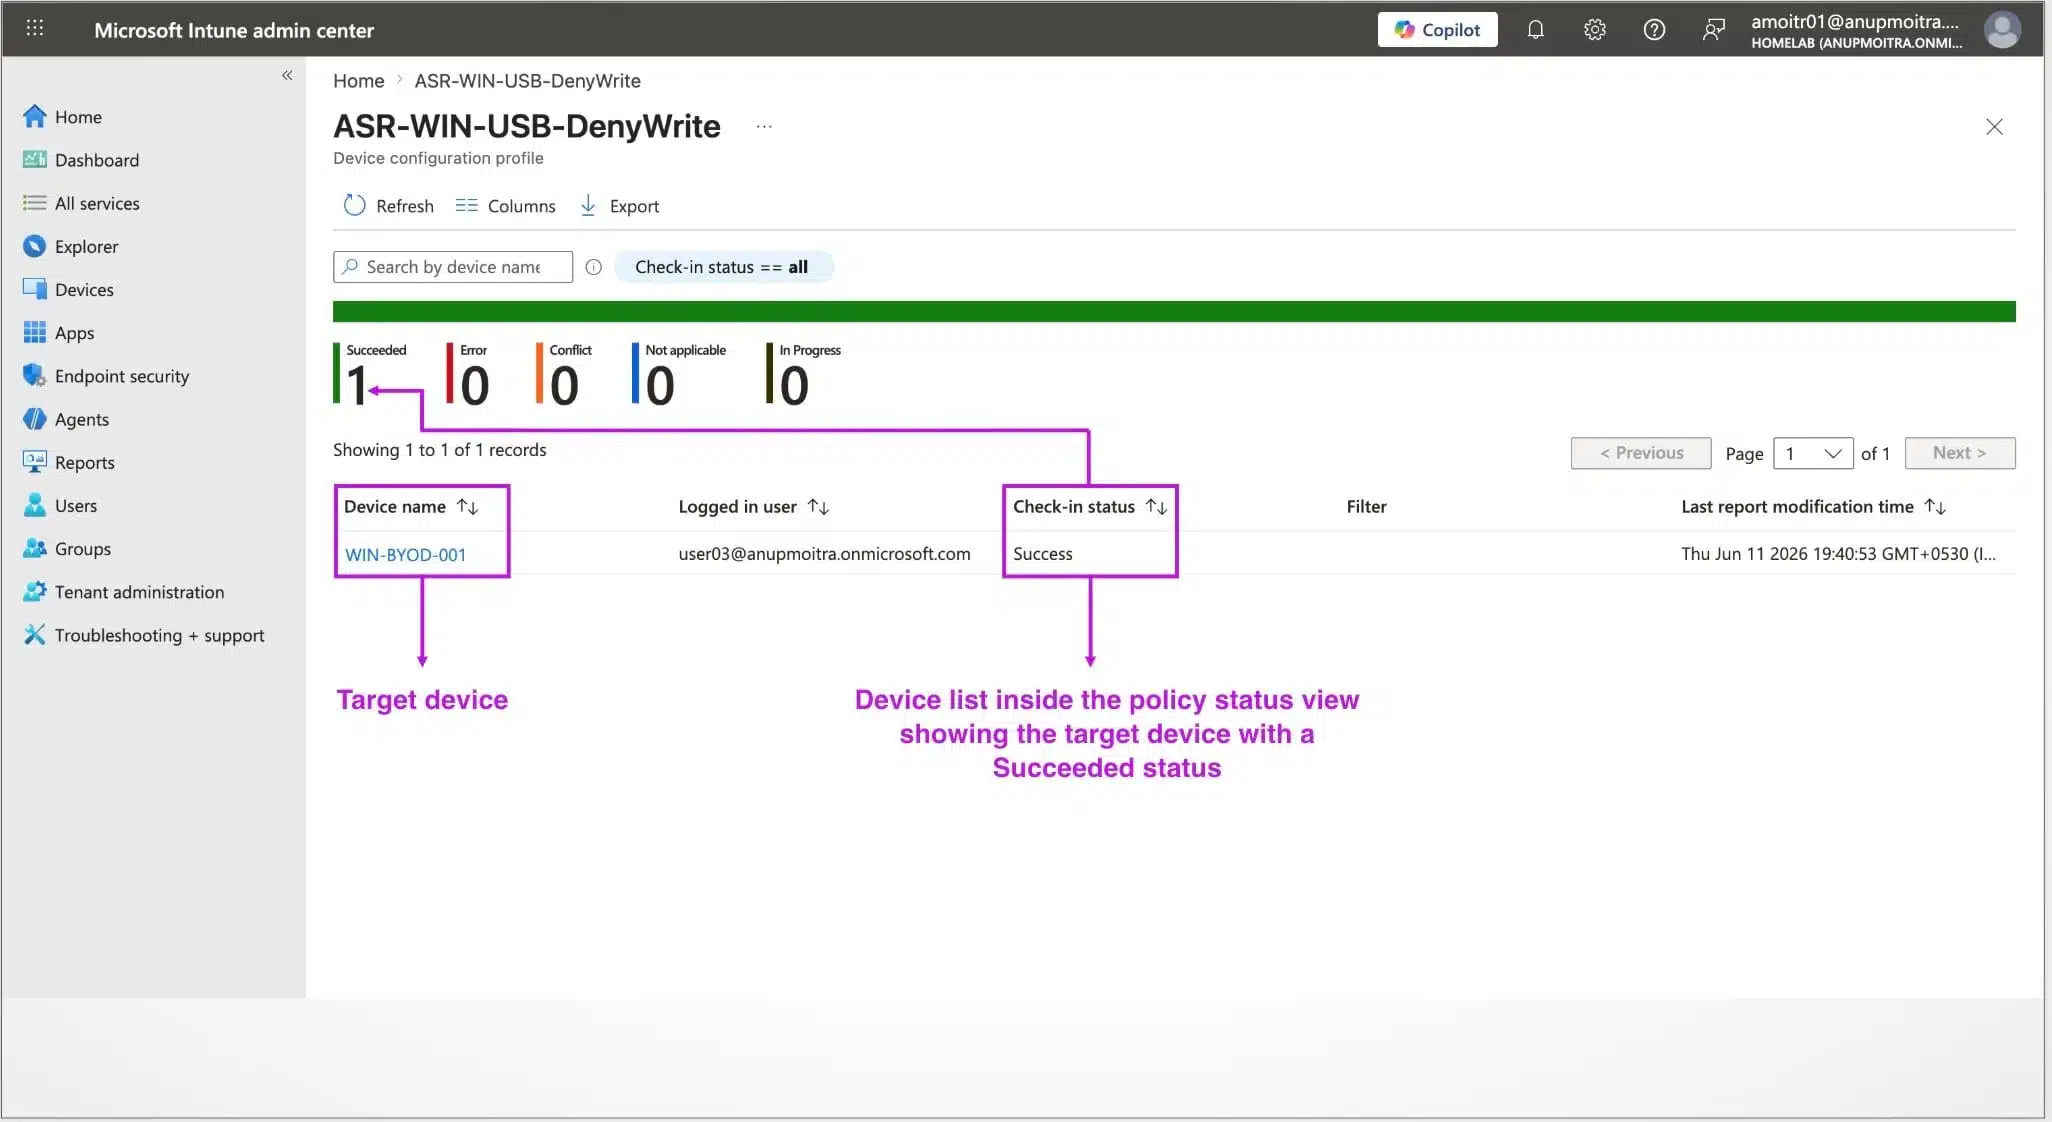
A Pending status usually means the device hasn't checked in with Intune yet, or hasn't reported the latest result back to Intune. This is normal shortly after policy creation. Force a manual sync or wait for the next check-in, then refresh the report.
Intune reporting can lag behind the actual device state. A device may already have the policy while the portal still shows a temporary Pending status. Always combine portal verification with endpoint testing.
Testing the Block on the Endpoint
Intune reporting confirms the policy was delivered to the device. You should also verify the actual behaviour on the endpoint itself. Reporting tells you the policy arrived; the endpoint test tells you what the user will experience.
How to test
Plug a USB flash drive into the managed Windows device. Open File Explorer and try to access the drive. If the full block policy applied correctly, you'll see an access denied message similar to this:
If you used the Deny Write Access method instead, the drive opens and you can read files from it. However, attempting to copy a file to the drive returns an access denied error.
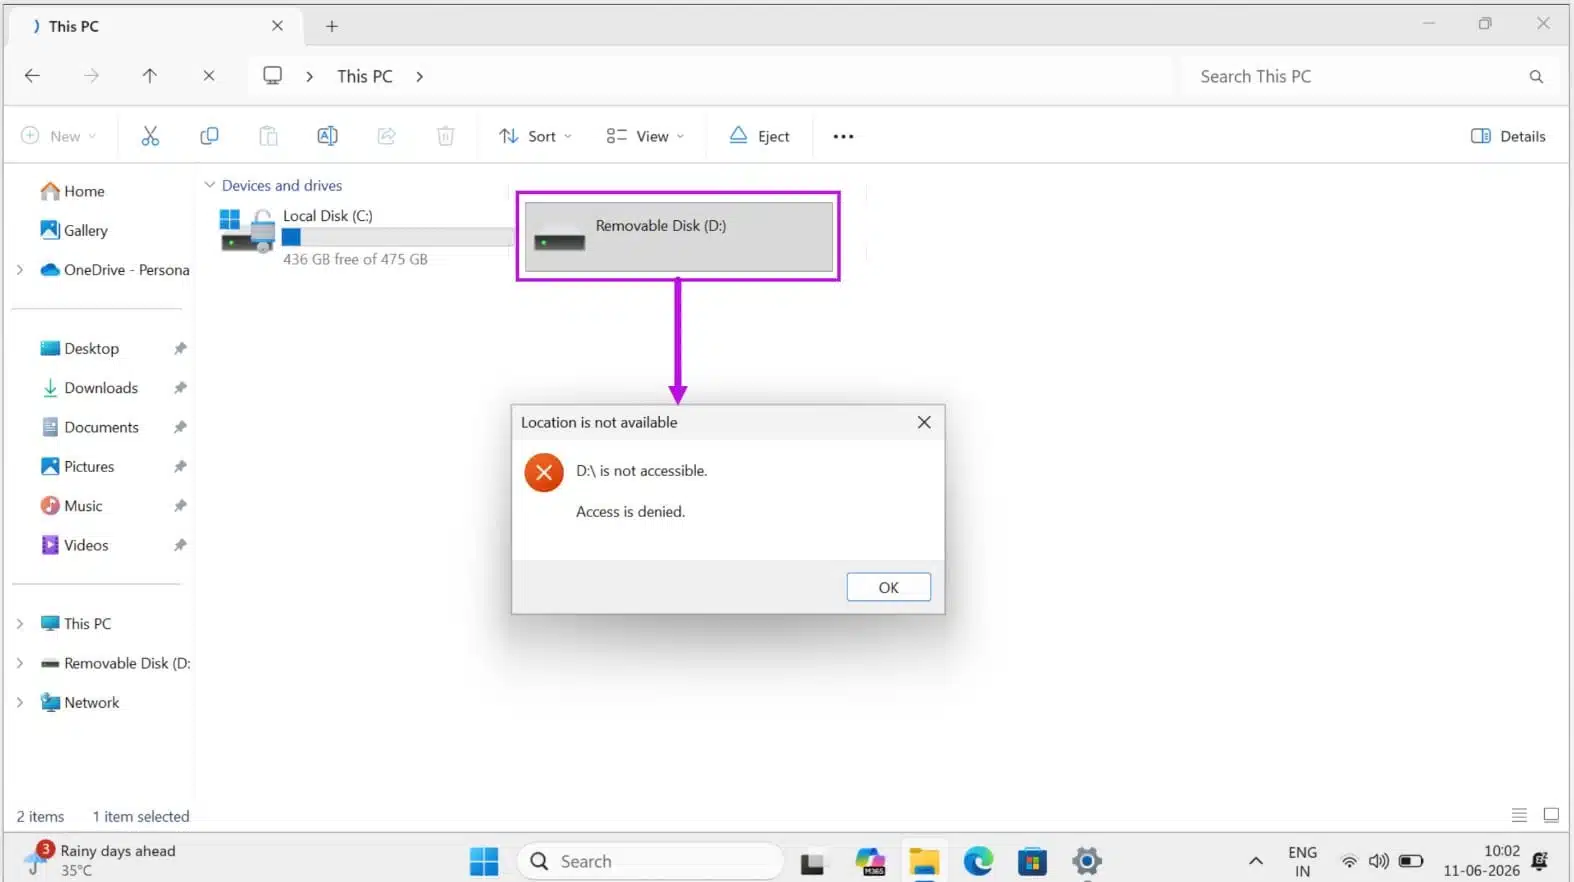
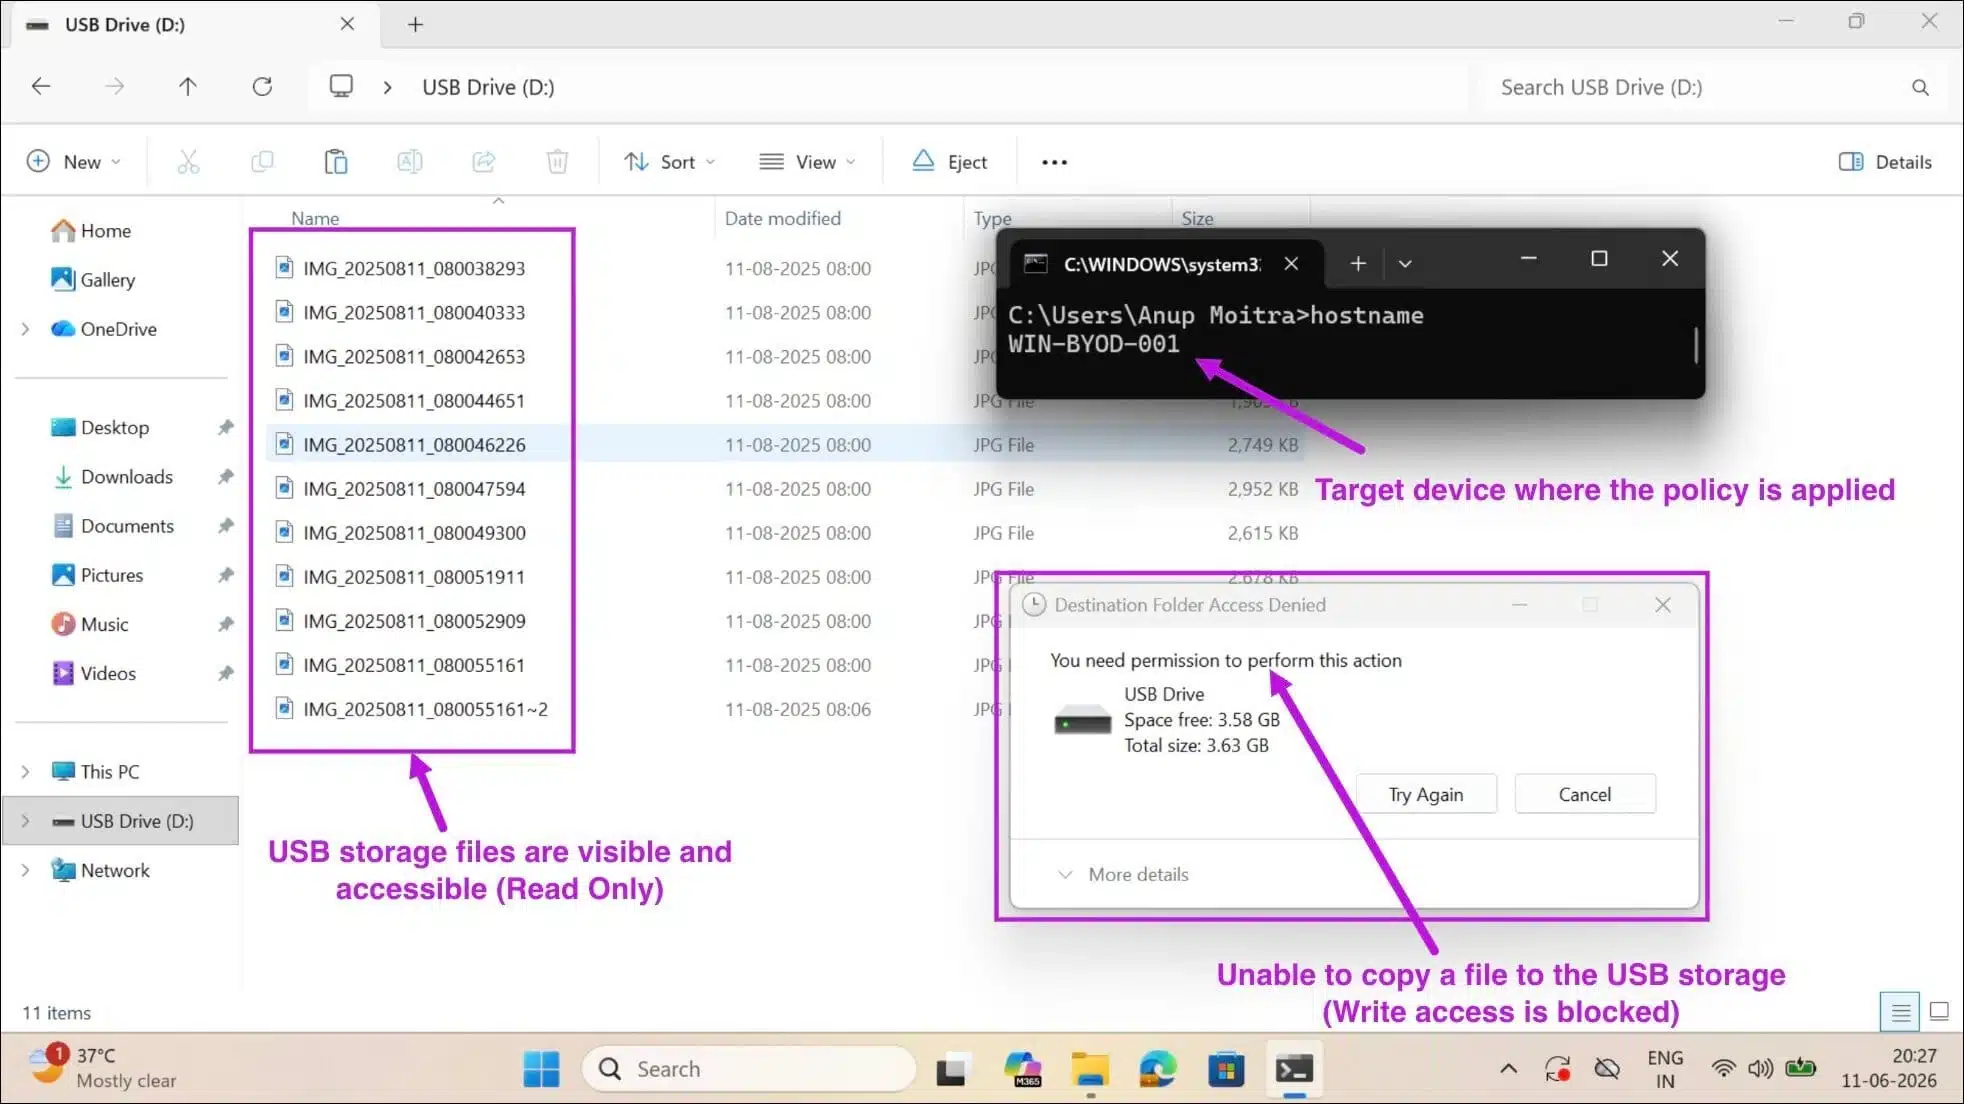
This is the definitive confirmation that you've successfully blocked USB storage. The access denied error on the endpoint is what you're aiming for, not just a green status in the Intune portal.
During testing, confirm that any USB keyboard or mouse connected to the device continues to work without interruption. When configured correctly, the policy targets removable storage access and should not block normal USB input devices.
Troubleshooting When the Policy Does Not Apply
If you've followed the steps above but the policy shows Pending after an extended wait, or the USB drive is still accessible on the endpoint after the policy reports Succeeded, work through the following checks in order.
- 1
Force a sync
The most common reason a policy stays Pending is that the device hasn't checked in or hasn't reported its latest status. Standard maintenance check-ins happen on a schedule, but you can force a sync manually.
From the Intune admin center:
Devices›All devices›[device name]›Sync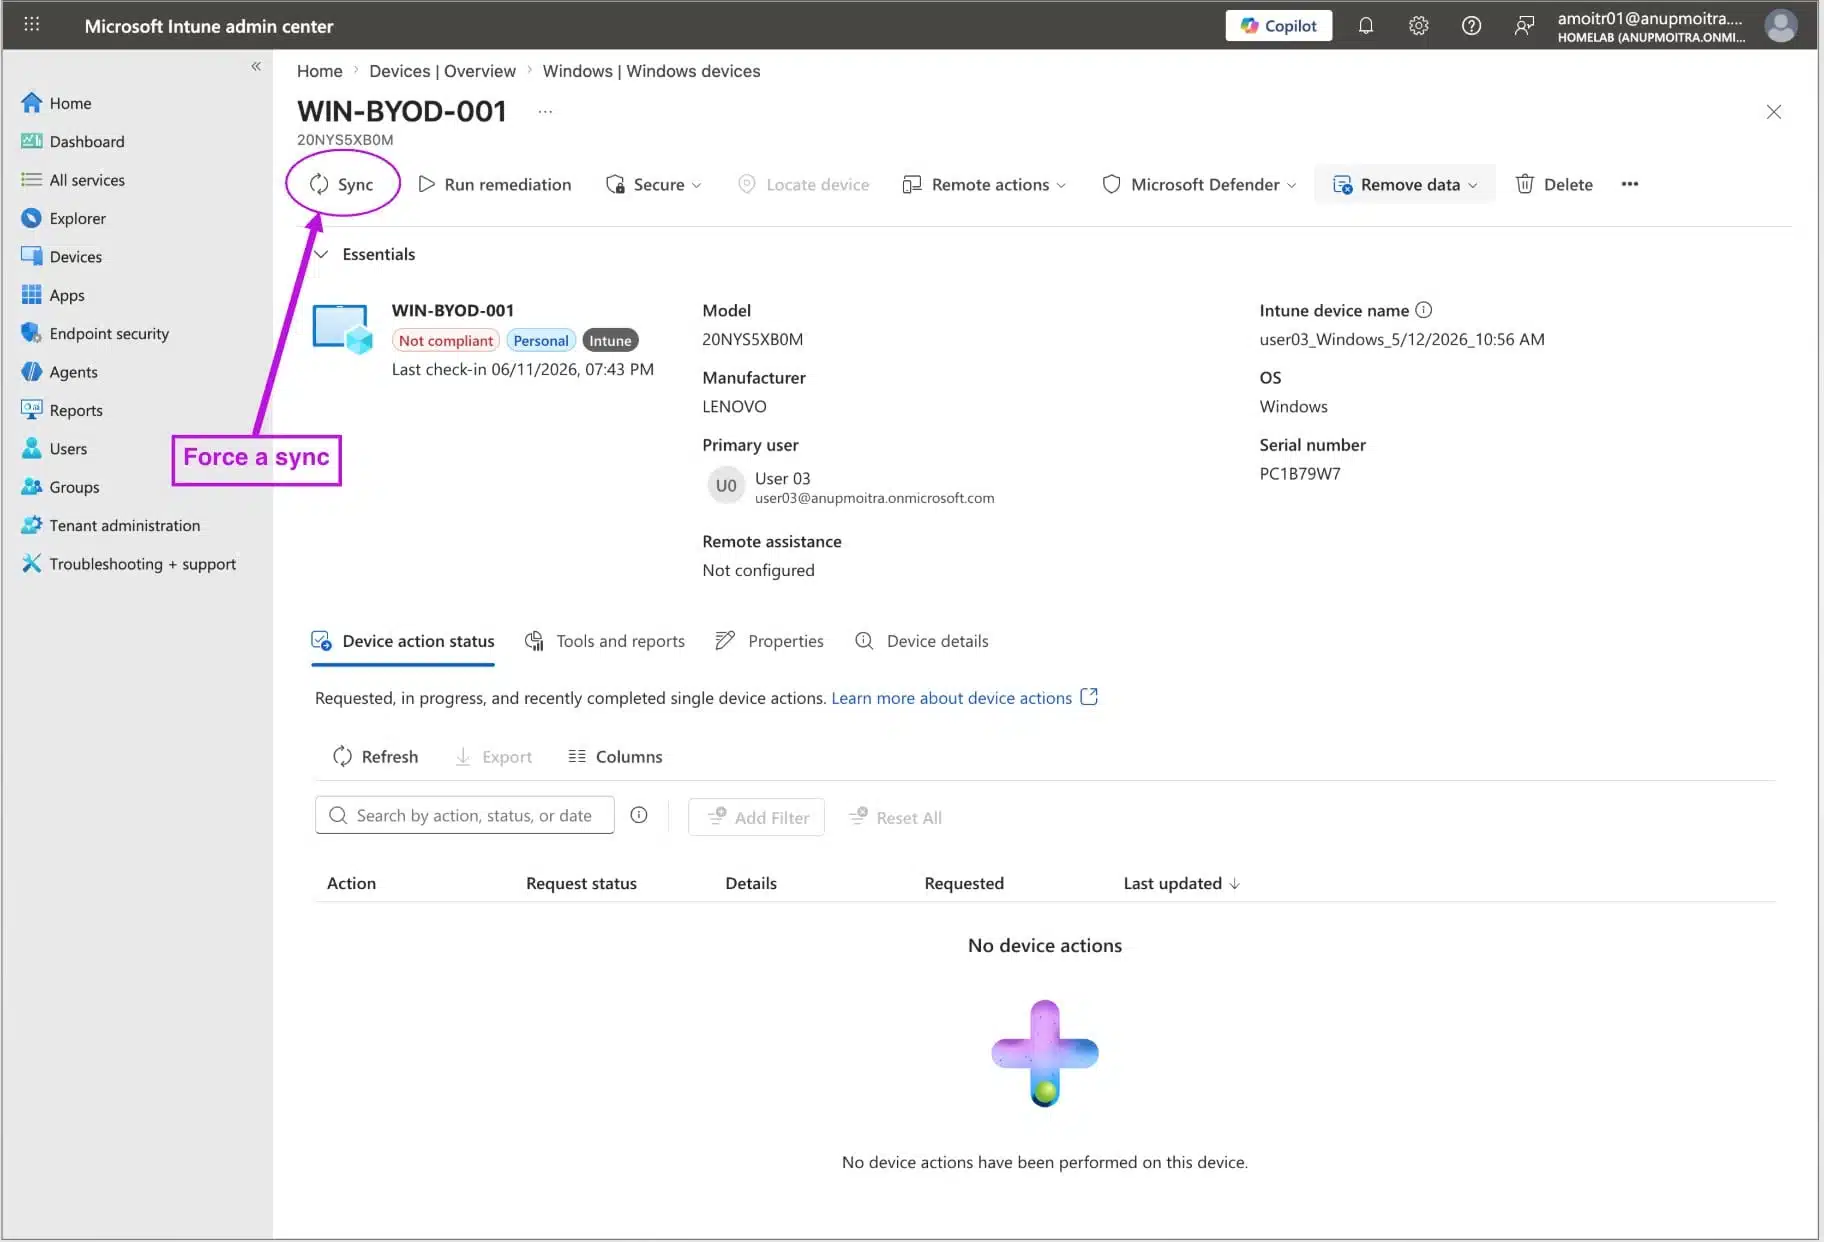
From the device itself: Settings › Accounts › Access work or school › [connected work account] › Info › Sync
From Company Portal: open Company Portal on the device and use Settings › Sync, or go to the device details and check status.
- 2
Confirm the device is in the correct group
Open Microsoft Entra admin center and check the membership of the security group the policy is assigned to. If the target device isn't a member, the policy will not reach it. If you're using a dynamic device group, remember that group membership can take time to calculate — for urgent testing, use a small static pilot device group.
- 3
Confirm the device is enrolled in Intune
Open the device record in Intune and verify that the device is managed by Intune. A device that is only Microsoft Entra joined but not Intune enrolled will not receive the policy. These are related states, but they are not the same thing.
- 4
Check for policy conflicts
If the policy status shows Conflict rather than Succeeded, another policy is configuring the same setting with a different value. Open the policy report, review the per-setting status, and identify the setting causing the conflict, then check which other policies also target the same device and configure the same setting. To resolve it, set the duplicate setting to Not configured in one of the policies, sync the device, and refresh the report.
- 5
Unplug, replug, and restart if needed
If the policy reports Succeeded but the USB drive is still accessible, unplug the USB drive and plug it in again. If the result doesn't change, restart the device and test again in a fresh Windows session.
| What you see | Most likely cause | What to do |
|---|---|---|
| Policy shows Pending | Device hasn't checked in, or hasn't reported the latest result | Force a sync, confirm the device is online, then refresh the report |
| Policy shows Conflict | Another policy targets the same setting with a different value | Use per-setting status to identify the duplicate and set one policy to Not configured |
| Succeeded but USB still works | Wrong setting selected, policy conflict, stale device session, or USB drive was already connected | Confirm the setting, unplug and replug the USB drive, then restart and retest |
| Device doesn't appear in the status report | Device isn't in the assigned group, is excluded, or isn't enrolled in Intune | Check group membership, exclusions, and Intune enrollment state |
| Policy shows Not applicable | Setting doesn't apply to the device platform, OS version, edition, or scope | Confirm the device is a supported Windows device and the correct device-scoped setting was selected |
| Policy shows Error | Policy failed to apply on the endpoint | Open the per-setting status, review the error code, and confirm OS support |
Creating an Exclusion for Approved Devices
In most organisations, a small number of devices may need to be excluded from a USB block. For example, an IT technician may have a dedicated troubleshooting laptop that needs to use bootable USB media, or a specific team may have approved workstations used to receive data from physical drives.
Because this guide recommends assigning the policy to a device group, the cleanest exception design is also device-based: include a device group, and exclude a device group.
- 1
Create a dedicated exception group
In Microsoft Entra ID, create a dedicated security group for approved exception devices, for example:
GRP-USB-Policy-Exception-Devices - 2
Add only approved devices
Add only the approved device objects to this group.
- 3
Exclude the group from the policy
Open your USB block policy and go to:
Properties›Assignments›Edit›Excluded groups›Add groupsSelect your exception device group, review the assignment, and save the policy. Any device in that exception group will be skipped by the policy assignment.
Do not use a user exclusion group for this device-targeted policy design. If the policy is assigned to devices, use a device exclusion group. This avoids unsupported include/exclude combinations and makes the policy easier to troubleshoot.
Keep the exception group small, use a clear approval process, and review membership quarterly to make sure every excluded device still has a valid business reason.
Summary: How to Block USB Storage in Intune
Now that you know how to block USB storage in Intune, you can protect your managed Windows fleet from data exfiltration and removable-media risk in just a few minutes, without affecting keyboards, mice, or other normal USB input devices. A single Settings Catalog policy deployed to a device group is the fastest, most reliable way to get there.
- The Settings Catalog method is the recommended way to block USB storage for most organisations.
- The "All Removable Storage classes: Deny all access" setting blocks both read and write access.
- The ASR Device Control method gives you a write-only block if you still need users to read from USB drives.
- For Attack Surface Reduction profiles, Microsoft documents Defender Antivirus as the primary antivirus prerequisite.
- Assign the policy to a device group so the restriction is tied to the Windows device.
- Use a device exclusion group for approved exception devices.
- A Pending status after creation is normal — force a sync or wait for the next device check-in.
- Always test with a real USB drive on the endpoint. The access denied error is the definitive confirmation.
- Deploy to a pilot device group first, validate, then expand to the full fleet.